Keyboard configuration in ZMK keymap-editor
Table of Contents
Keymap-editor is a powerful tool for configuring keyboards on ZMK, allowing you to conveniently and quickly turn an idea into a ready-made layout. This article describes the procedure for connecting keymap-editor and its main features from the perspective of both a new user, just beginning to delve into the world of split keyboards, and someone already familiar with split keyboards and configuring layouts in Vial.
Getting started with keymap-editor
Keymap-editor is a web application, accessible from a browser at https://nickcoutsos.github.io/keymap-editor/. To use it, you need to meet several conditions:
- The user must be registered on https://github.com/
- The user needs a fork of the repository https://github.com/ergohaven/ergohaven-zmk-config
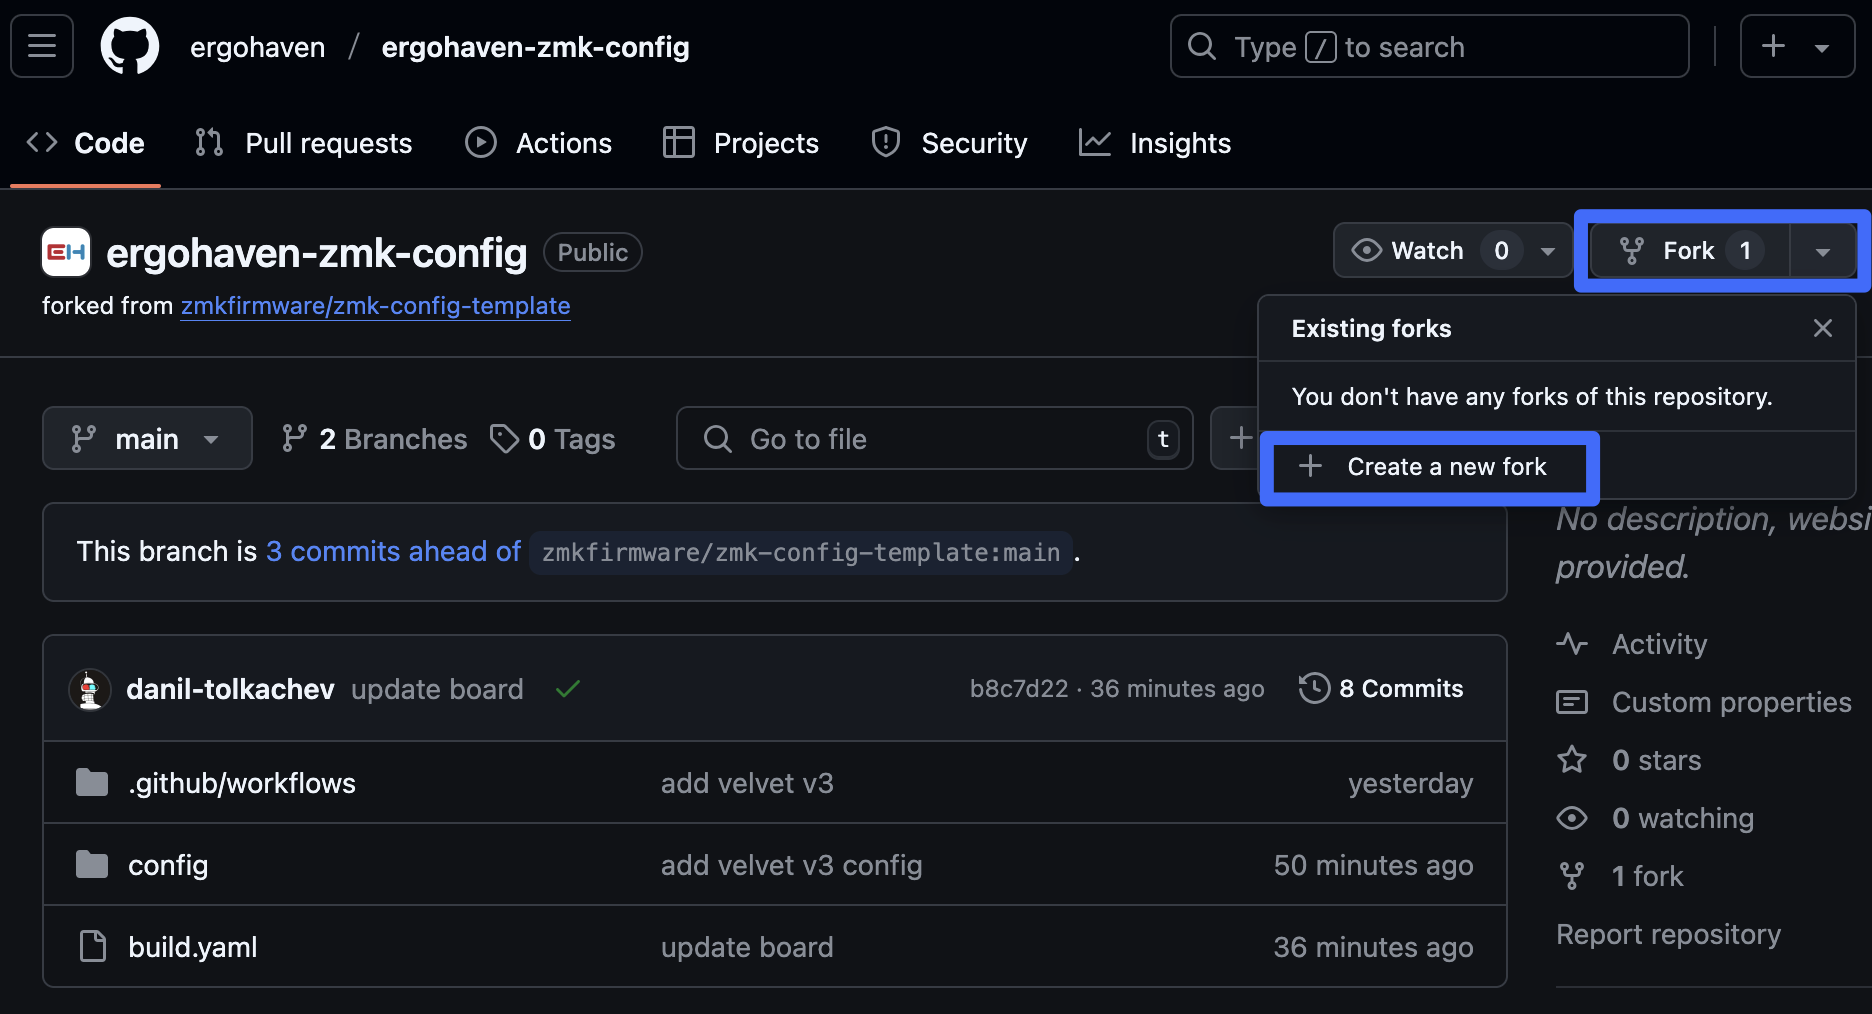
In the fork, you need to enable GitHub Actions to automatically build the firmware after making changes to the layout. Go to the Actions tab and click the I understand my workflows, go ahead and enable Actions button.
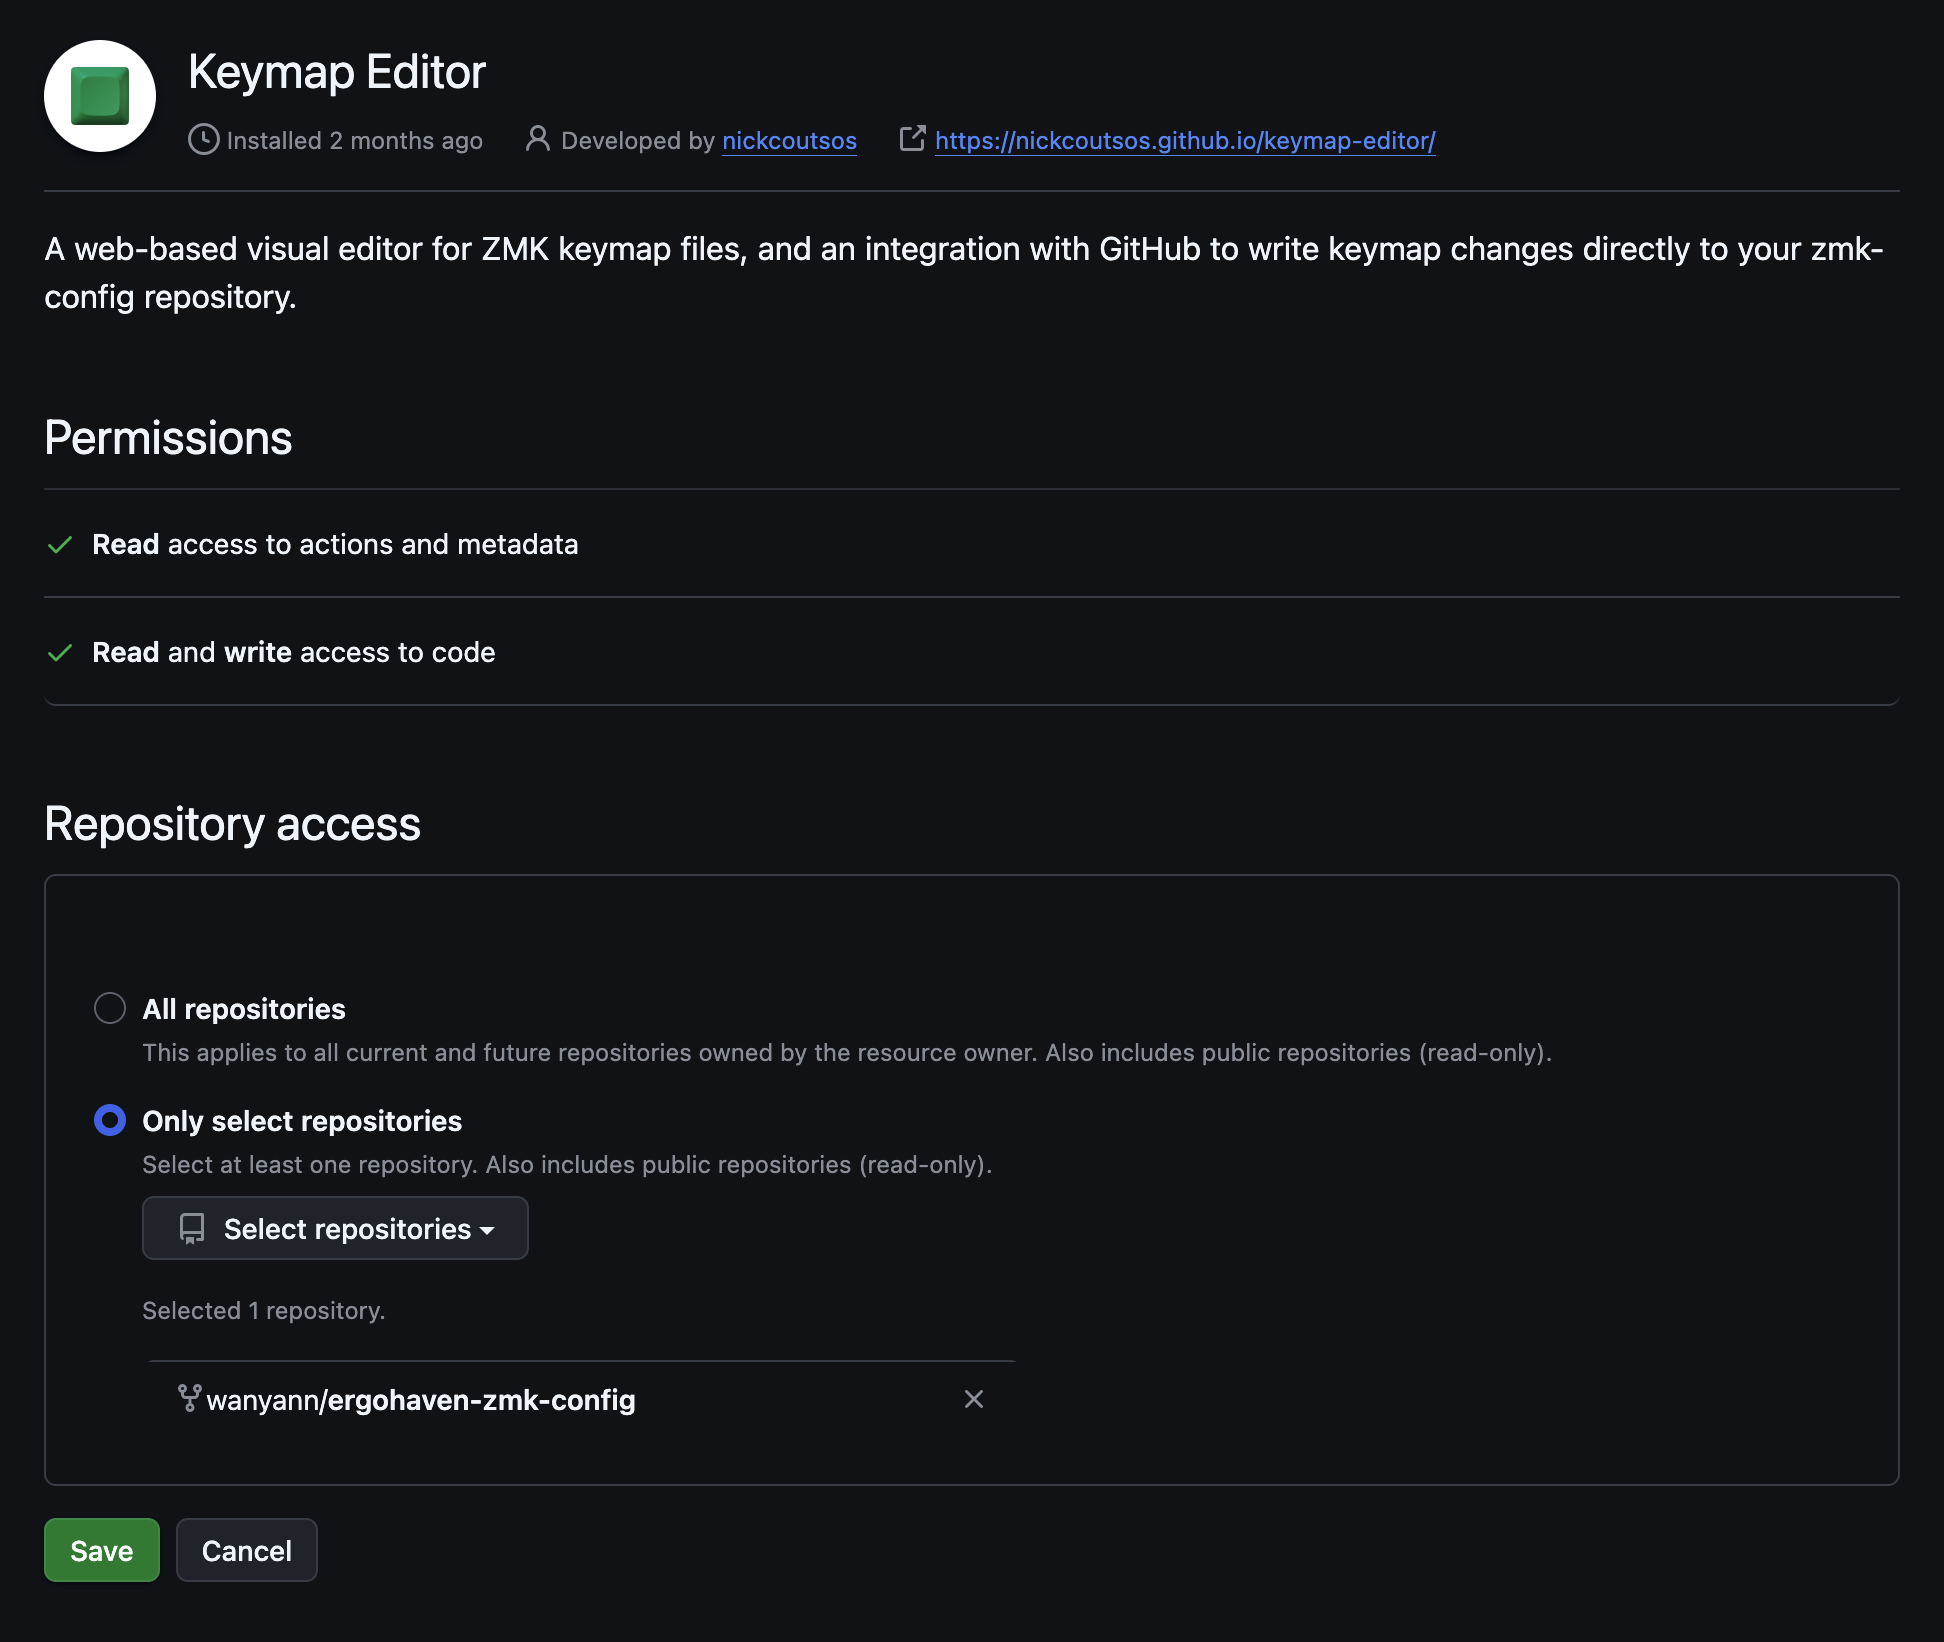
Go to https://nickcoutsos.github.io/keymap-editor/, on the opened page, select GitHub, authorize, and grant access to the created fork for Keymap Editor. To grant access, check the Only select repositories option, and select your fork of the
/ergohaven/ergohaven-zmk-configrepository. Then click Save to commit the access settings changes.
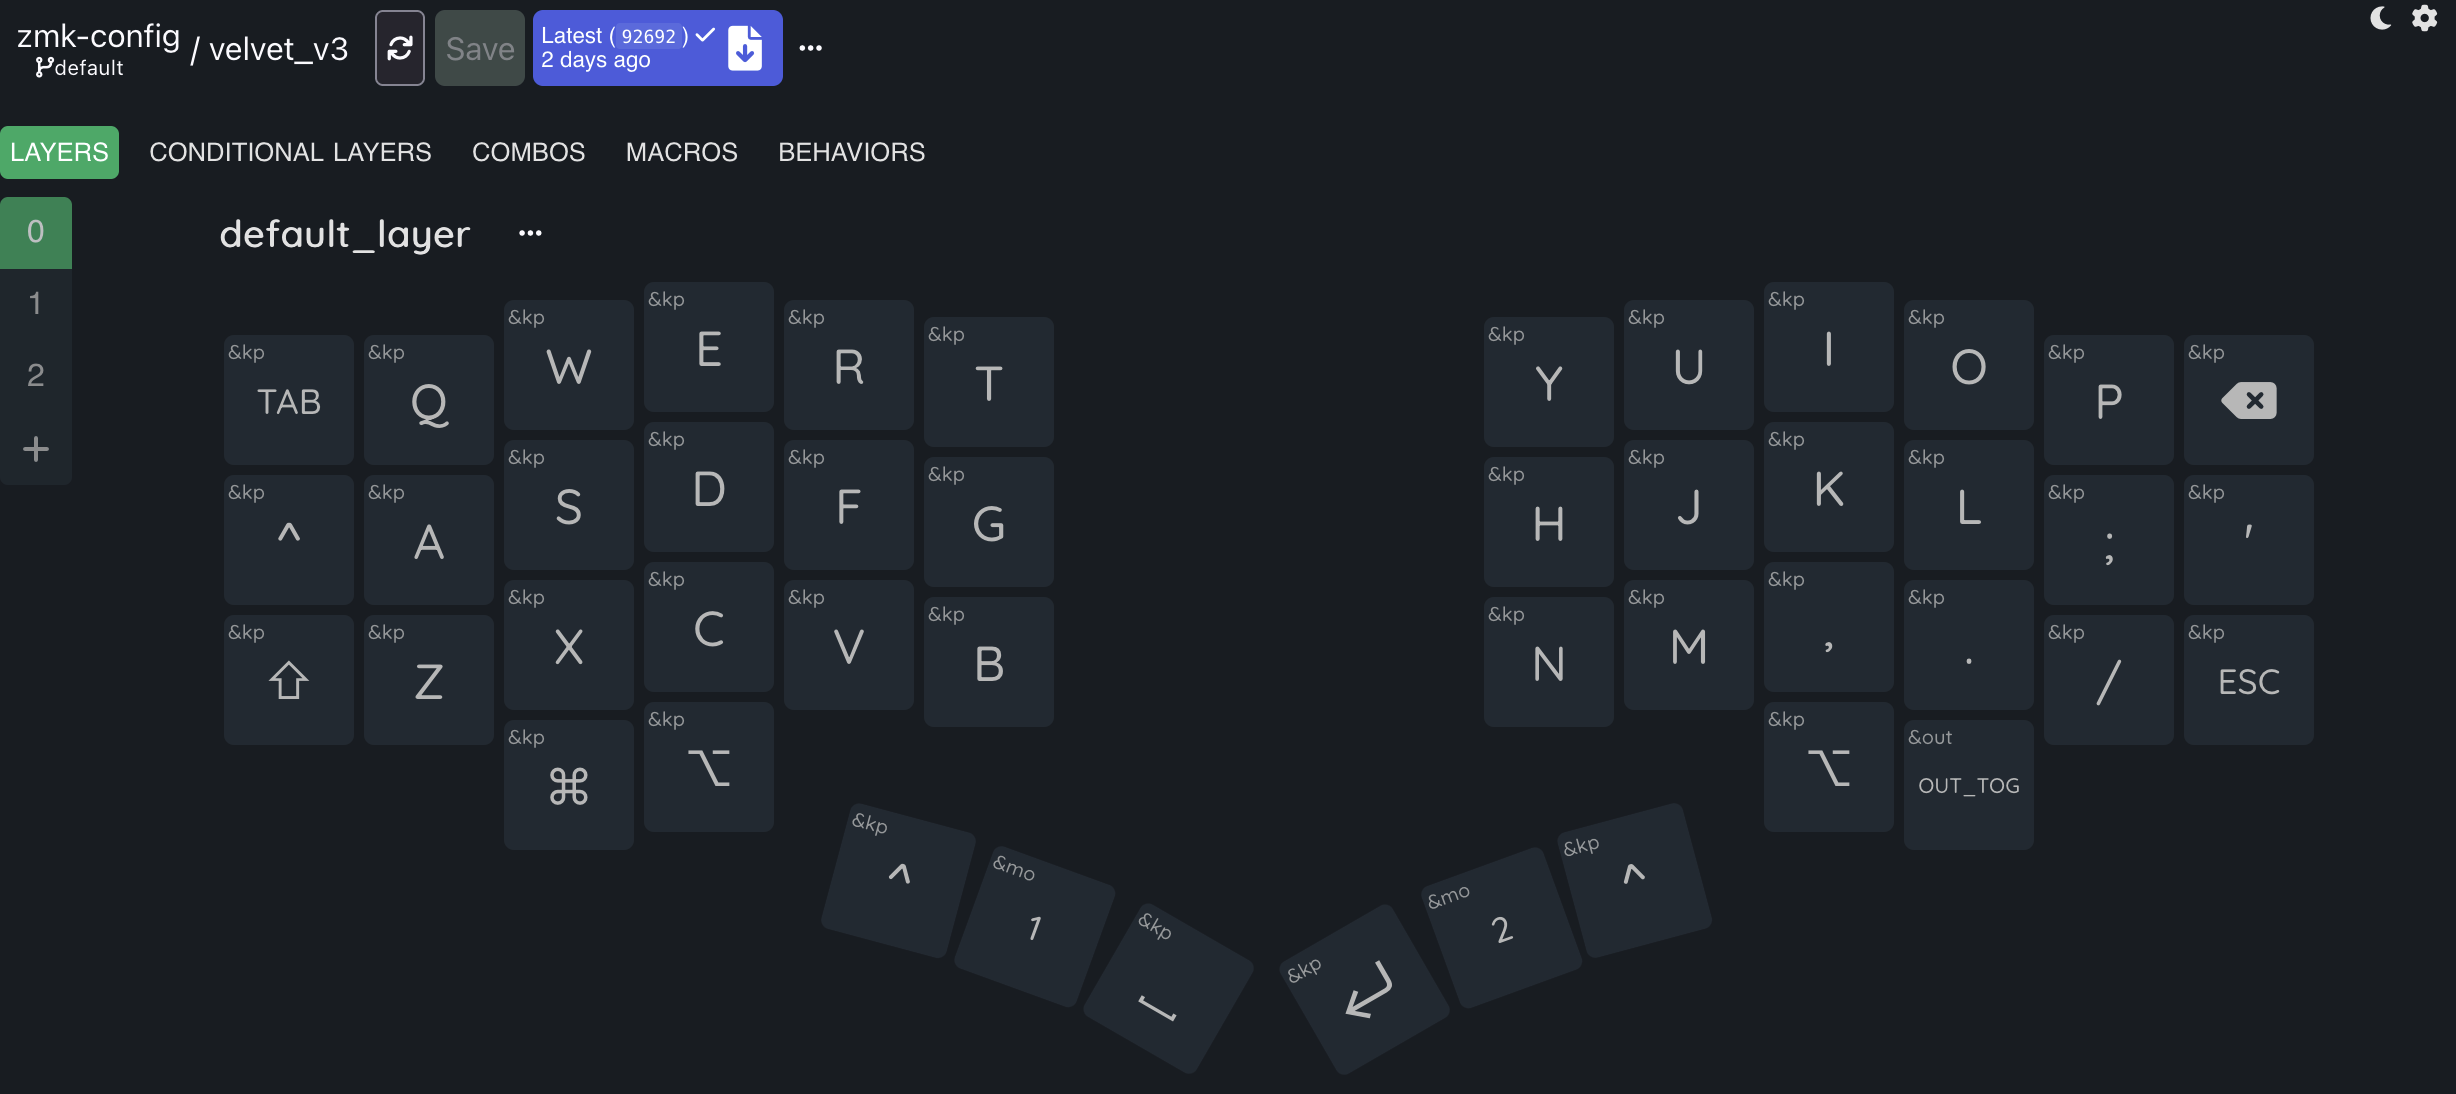
Once the steps described above are completed, the layout is ready for changes, hooray! Go to https://nickcoutsos.github.io/keymap-editor/ and you will see the default layout.
Remapping keys
To remap a key, click on it, and a window will open to select a new Behavior for this key.
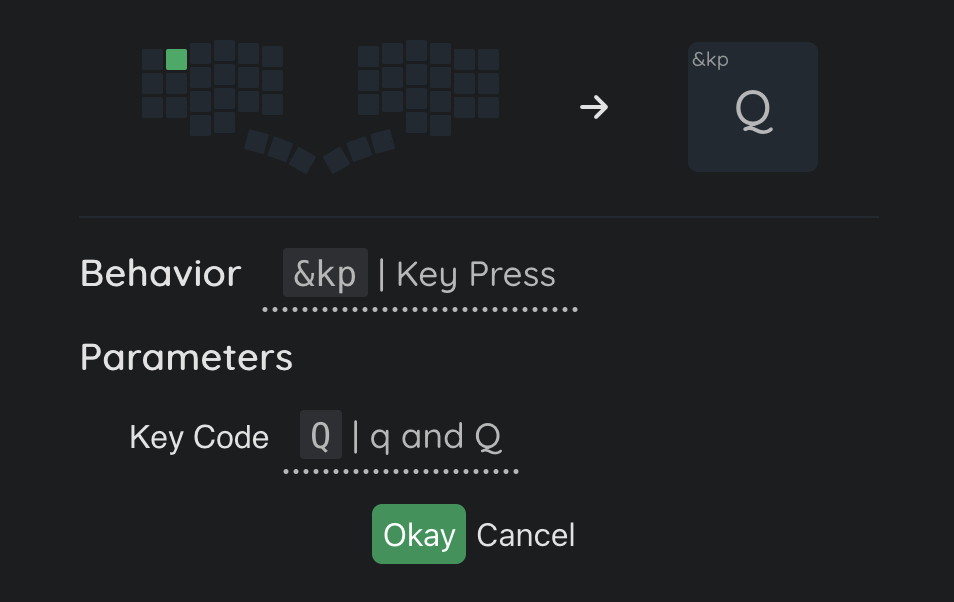
In the window, you need to select a Behavior for this key. Behavior is an entity in ZMK that determines what action will be performed when the key is pressed, for example, &kp (Key Press) simply sends a key press to the OS. Each &kp has a Key Code parameter, in which we specify which specific key will be pressed. In the screenshot above, the Q key is specified in this parameter. If we want to assign Z instead of Q, for example, we need to click on the Key Code field.

The window expands and the right side displays a list of key codes available for assignment. In the search bar for available key codes, enter Z, select Z among the filtered codes, click Okay and it’s done, the key has been replaced!

Above the list of keycodes are checkboxes with modifiers
Shift,Alt,Ctrl, andGui, with prefixes “L” and “R” indicating the left or right modifier. If you check one of the modifier checkboxes, a key combination with the checked modifier will be sent to the OS. For example, if we checked theLCtrlcheckbox in the window above, pressing the key would immediately send theLCtrl + Zcombination. Convenient, we make a key combination with one key press!
Next, the changes must be saved. Click Save in the upper left corner. If desired, you can give the change a name to remind you which changes to keymap were made, or leave the field blank and click Commit.
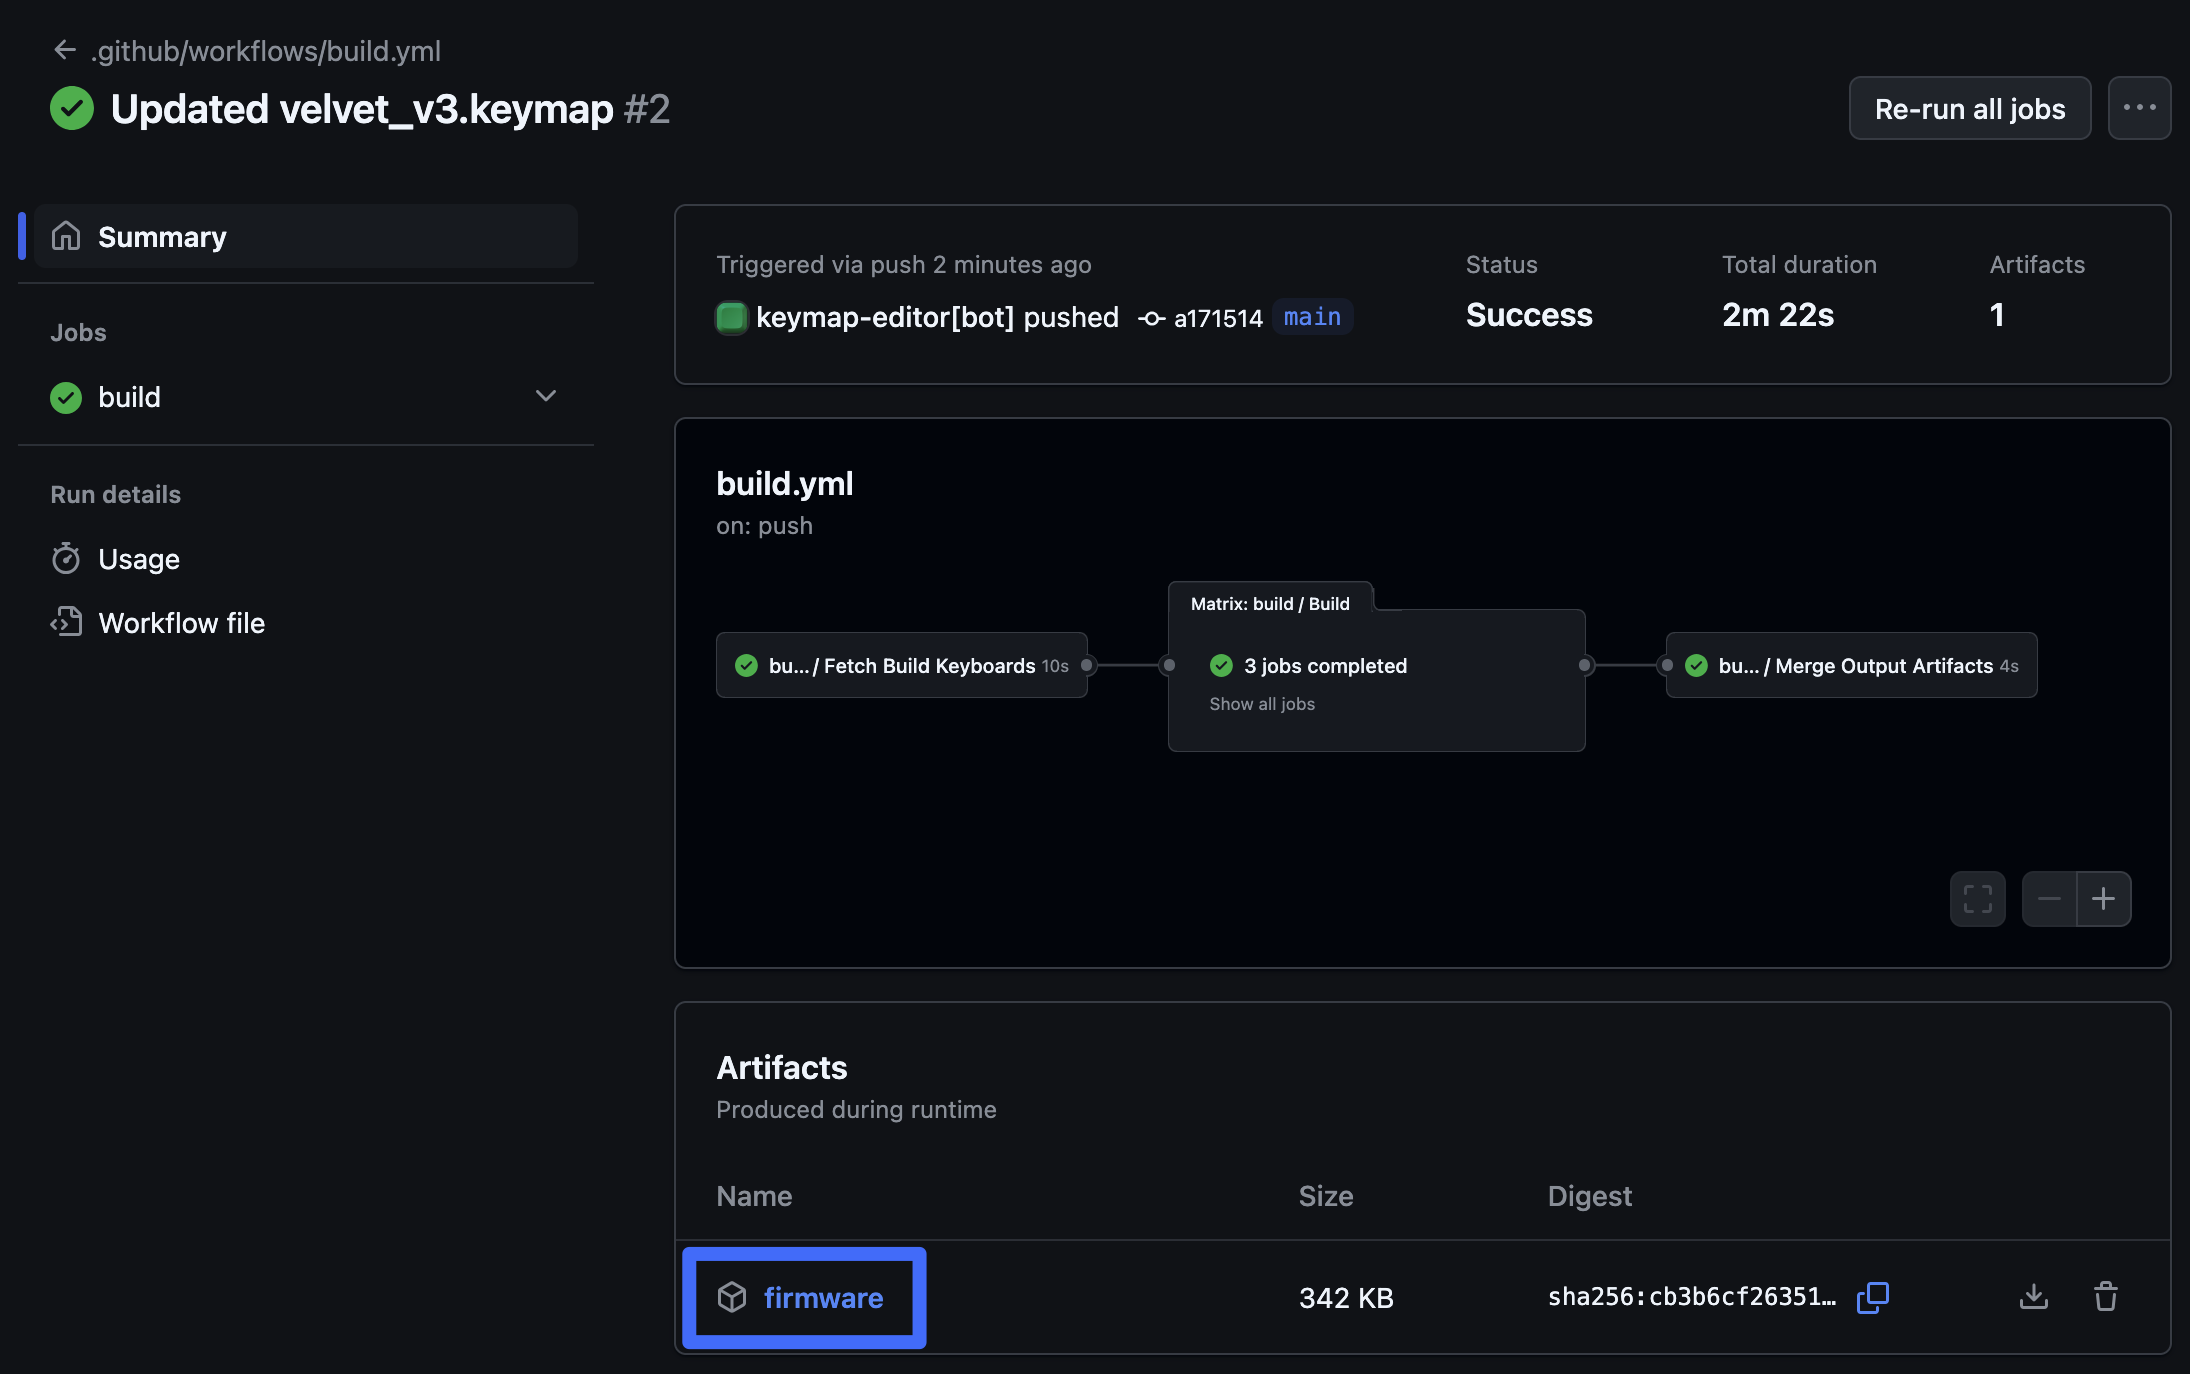
The firmware has automatically started building, this process usually takes about two minutes. Click on the blue button with the build status.

The opened page displays the statuses of all build stages. After all stages are completed, an Artifacts section will appear, containing the firmware archive. Click on it to download.
After downloading the firmware archive, flash the keyboard with the files from it, following the steps described in the First steps with a Keyboard on ZMK (see the “Keyboard firmware” section).
Changes to the layout have been made!
Layers
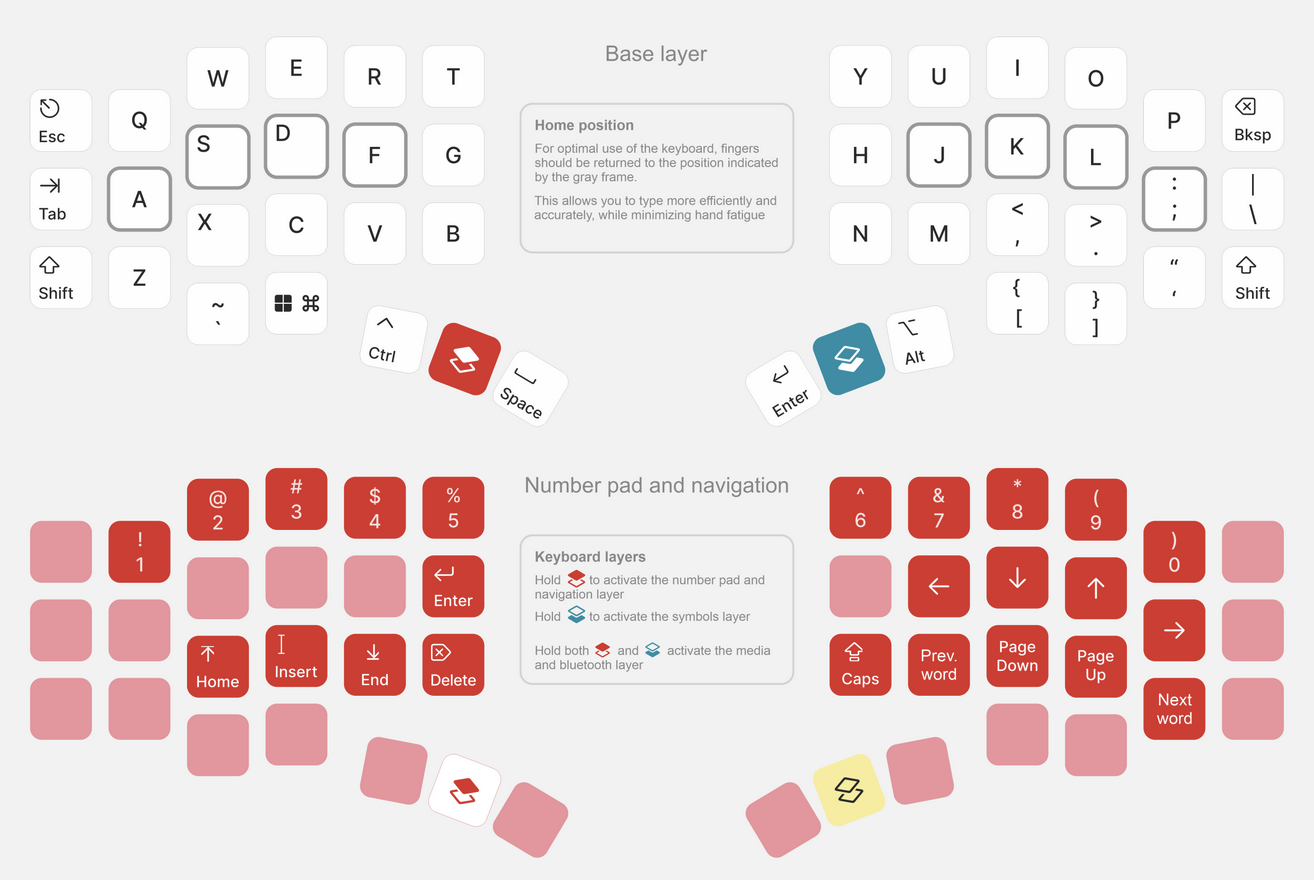
Split keyboards use layers, which are a kind of additional modifiers, like Shift or Control. By switching the keyboard to another layer, pressing the keys will register other symbols or functions assigned to that key on that layer. Sounds complicated, let’s look at an example: If you press and hold the red key on the left half, the keyboard will switch to layer 1, and pressing, for example, the W key will send the 2 key press to the OS, because in the default layout it is assigned to the W position on the 1st layer.
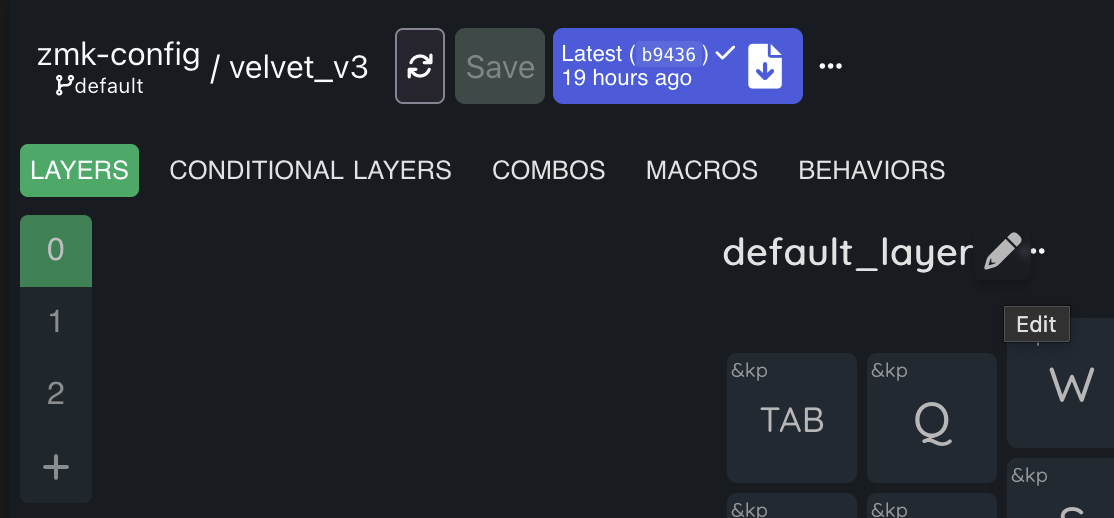
Renaming layers
You can change the names of layers, this can make it easier to configure the layout. To do this, hover the cursor over the layer name and click the Edit button with the pencil icon.
Switching layers
In ZMK, there are several Behaviors for switching layers:
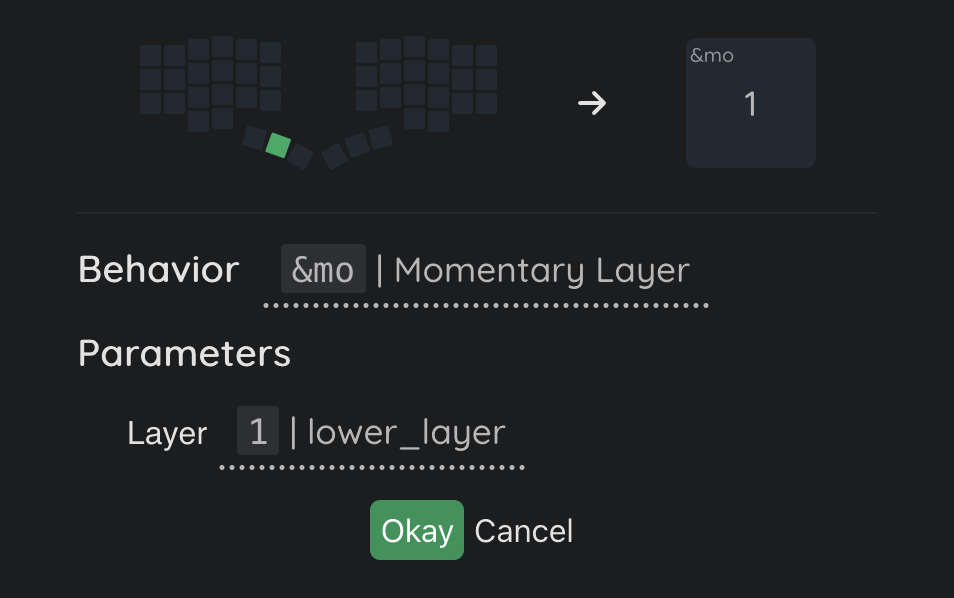
&mo
&mo - enables the specified layer while the key is held down. This Behavior is used in default layout, &mo 1 is assigned to the red key, and holding it down enables the 1st layer.
<
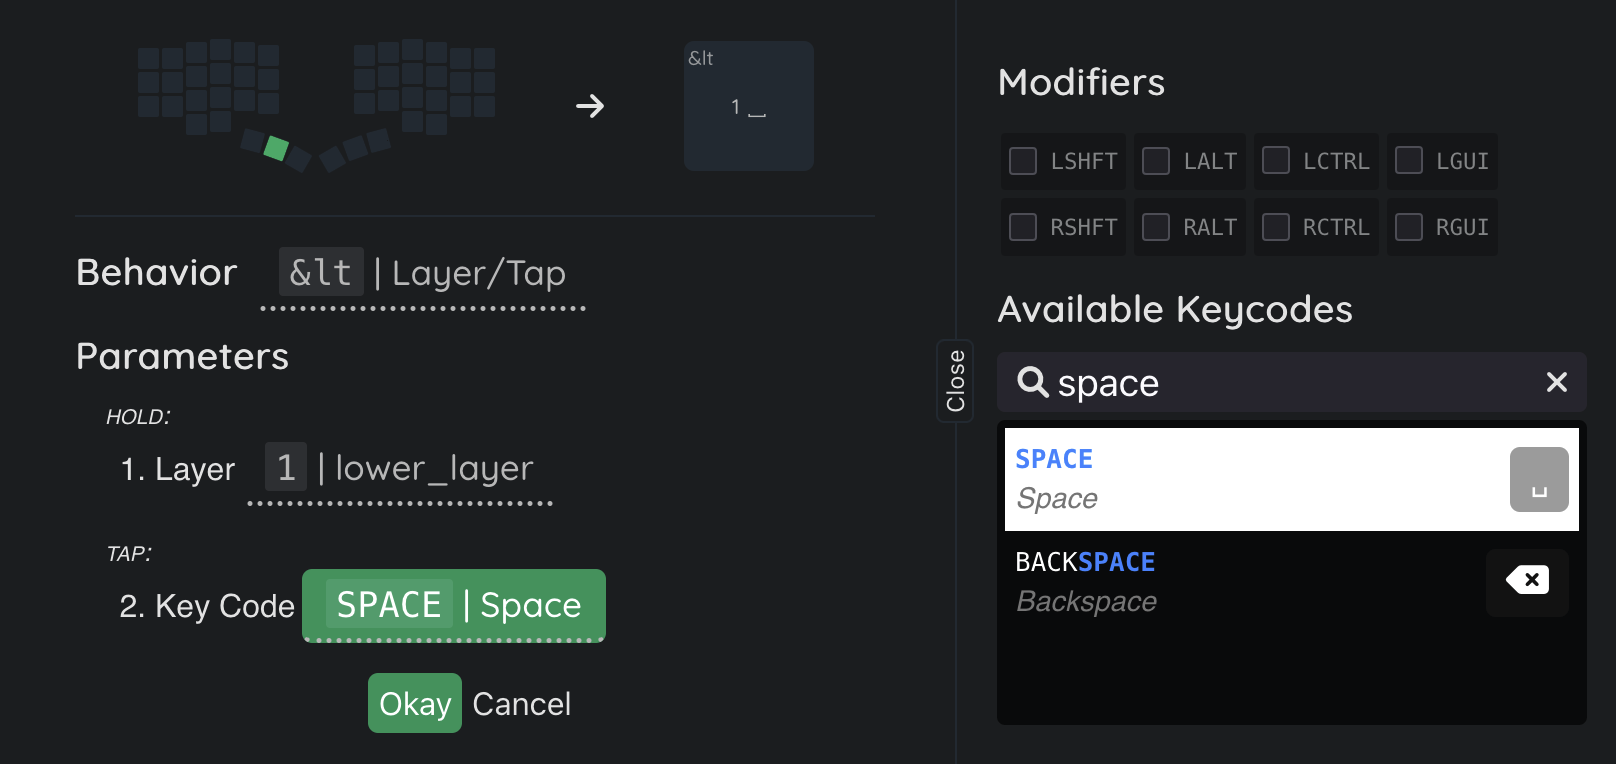
< - a hybrid Behavior of a standard key press (&kp) and layer activation while the key is held down (&mo).
For example, on the red key, which has &mo 1 in the standard layout, we assign <, passing the following parameters: 1st layer and the Space key code. Then, pressing it will type a space, and holding it down will change the layer, pure magic!
It is worth noting that in this way we reduced the number of used keys on the 0th layer, because initially
&kp Spaceand&mo 1were on two separate keys pressed with the thumb, we have combined them into one, and now you can place some other Behavior in place of&kp Space.
&tog
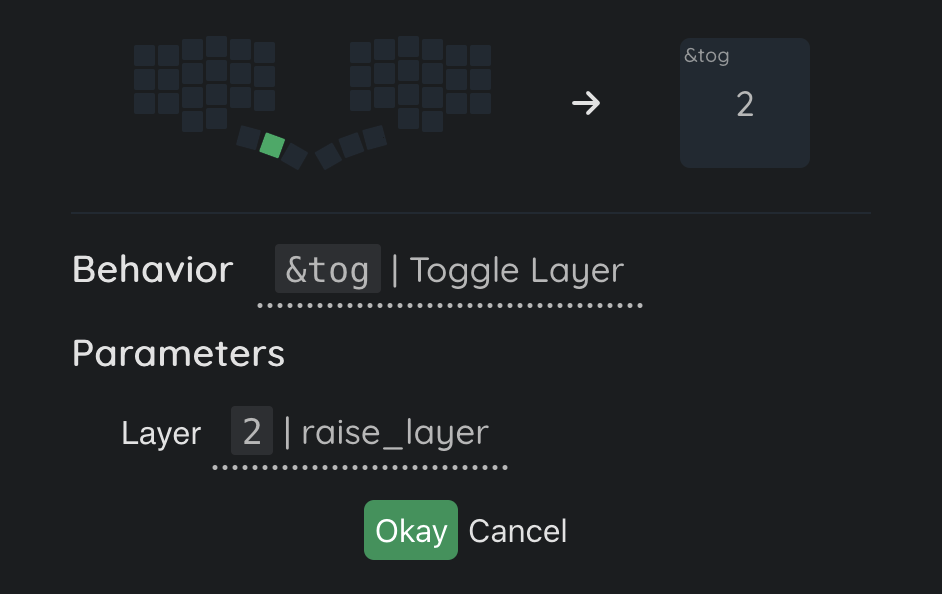
&tog - when pressed, toggles the state of the layer, turns on the specified layer if it is off, and vice versa, turns it off if it is on. (analog of TG() from Vial)
When using this Behavior, it is worth remembering that the active layer at the moment is the enabled layer with the highest number, by turning on layer 2 by pressing &tog 2, it is impossible to switch to layer 1 by pressing &mo or &tog, because it has a lower number, and despite the fact that pressing &tog 1 will enable layer 1, the active layer will still be layer 2 because it has a higher number. To switch to layers with a number lower than the 2nd layer, you have to place the &tog 2 key on the 2nd layer.
To consolidate, let’s analyze the scenario of working with &tog step by step:
- Being on the 0th layer,
&tog 2is pressed - layer 2 is enabled, it will not be possible to switch to the 1st layer by pressing&tog 1or&mo 1; - Being on the 2nd layer,
&tog 2is pressed - layer 2 is disabled, the keyboard returned to the 0th layer, and we can switch to the 1st layer.
&to
&to - when pressed, enables the layer specified in the parameter, and disables all other active layers.
This Behavior is very convenient for switching to a layer by pressing, because unlike &tog, the &to Behavior turns off all active layers, and there is no need to separately disable the current active layer.
Example: being on the 0th layer, &to 2 is pressed - layer 2 is enabled, we can switch to the 1st layer by pressing &to 1, because this behavior, in addition to enabling layer 1, disables all other enabled layers, in this case the 2nd.

&sl
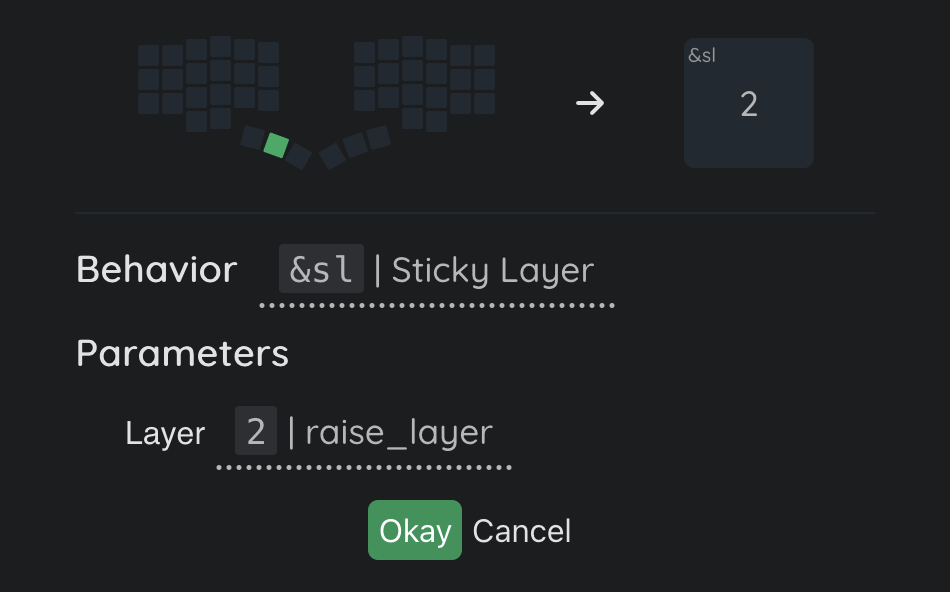
&sl - when pressed, enables the layer specified in the parameter, but only for one press. (analog of OSL() from Vial)
It is convenient to use this Behavior to switch to a layer with function keys, because most often they need to be pressed 1 time. Pressed &sl 3 (on this layer in the default layout are F1-12 keys), the layer turned on, pressed the F1 key, and the layer immediately turned off automatically.
It is also important to mention that if no press occurs within 1 second after switching to a layer via
&sl, the layer will automatically turn off. This timeout is configured in the Behaviors -> Reconfiguration section, more details in the Behaviors section.
Moving layers
Sometimes when configuring a layout, it becomes necessary to change the layer order number. In keymap-editor, this is implemented very conveniently, just drag the layer to the desired position.
When moving a layer in this way, keymap-editor automatically adjusts the parameters of all Behaviors that previously activated this layer. For example, if the layout has &mo 2, if you move the 2nd layer to the position of the 1st layer, the assigned key &mo 2 will automatically change to &mo 1.
Copying layers
Another useful layer management feature is copying them. To make a copy, click on the … button next to the layer name and select Duplicate Layer. After clicking, a full copy of the layer will be created.
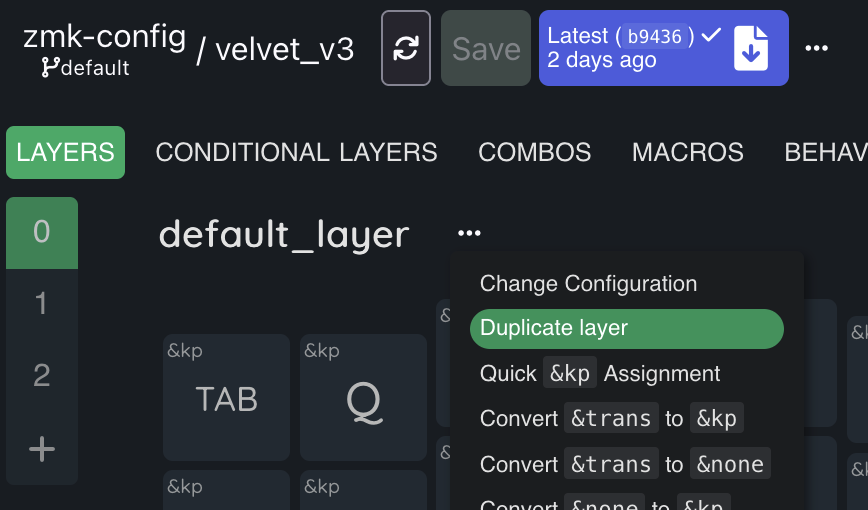
Quick key assignment
On any layer, you can quickly remap keys by clicking on the … button next to the layer name and selecting Quick &kp Assignment.
In the opened window, it is convenient to assign pressing numbers, letters, and function keys
Several useful behaviors
&mt
The Mod/Tap Behavior allows you to assign a specific Behavior to a short press (TAP) of a key, and another Behavior to a hold (HOLD) of a key. (Analog of LShift_T, LCtrl_T, etc. keys from the Quantum tab in Vial) By default, a short press is considered a press lasting less than 200 milliseconds. If you hold it longer, then a hold is registered.
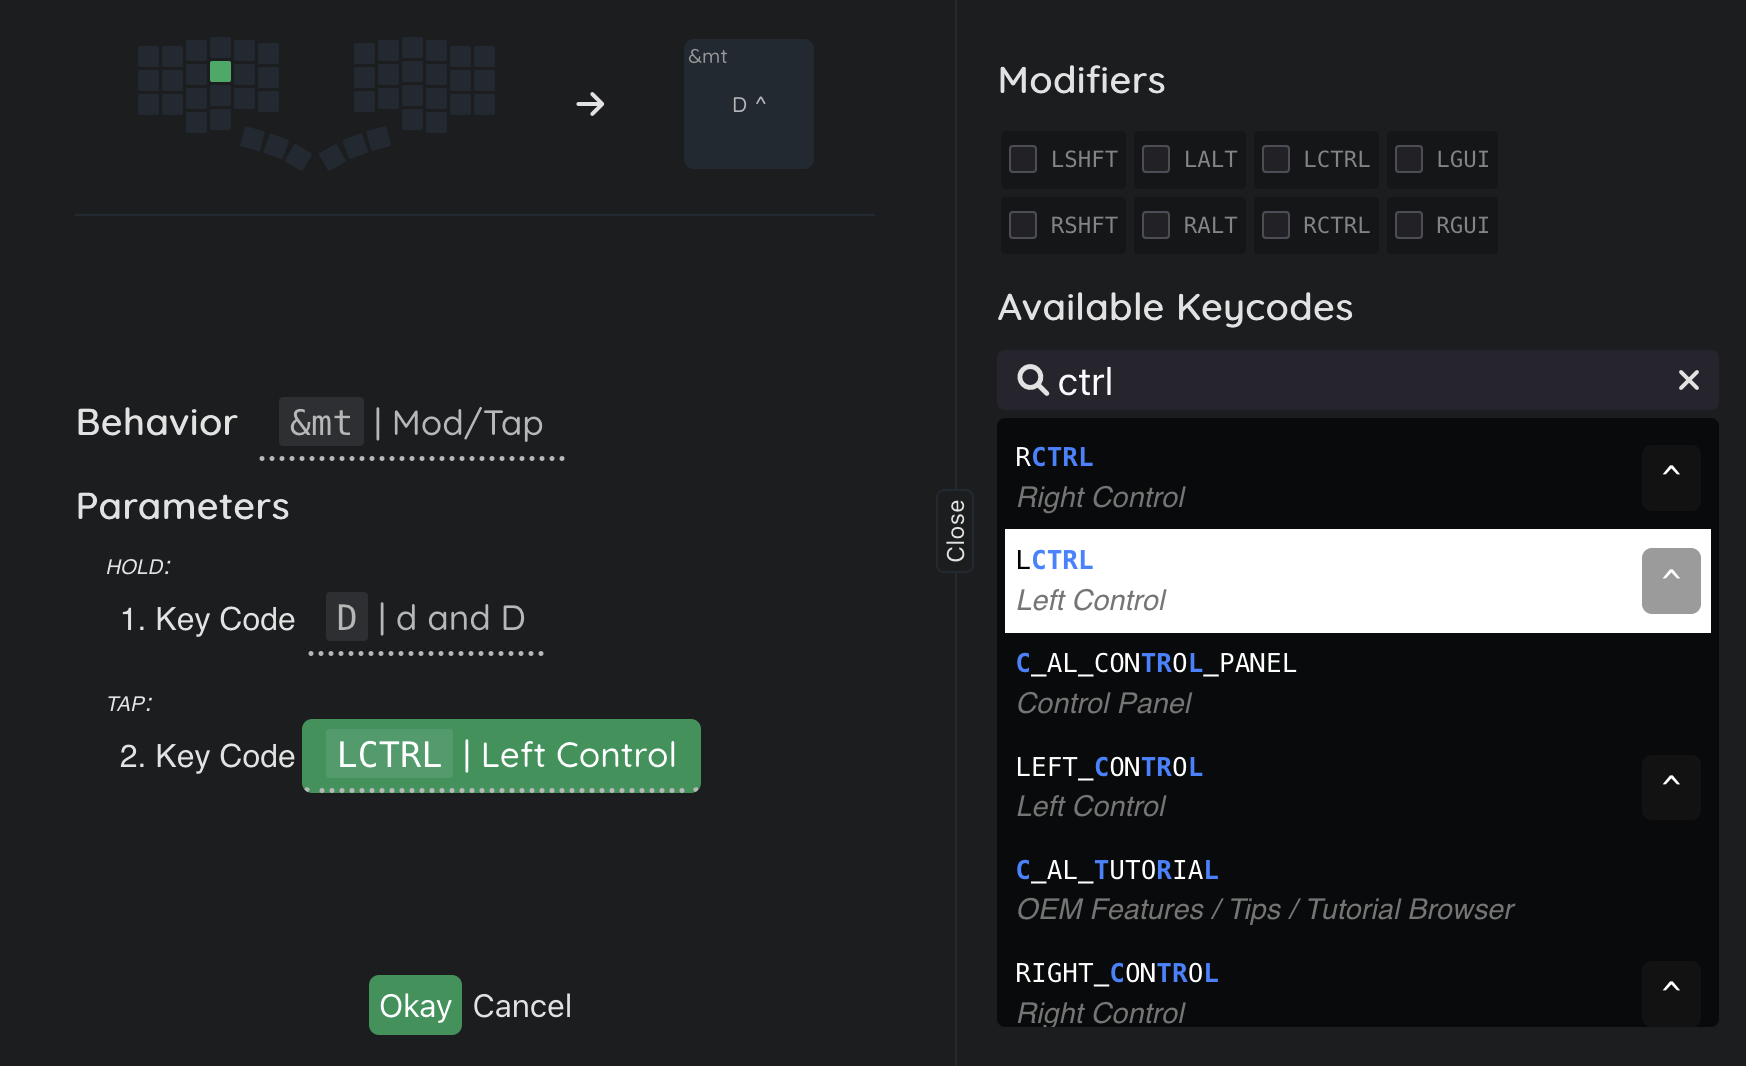
If you configure the Behavior as in the screenshot above, then when you short press the key, the letter D will be typed, and when you hold it, the Left Shift will be held down.
&sk
When you press a Sticky Key, it holds the key down and releases it after the next press of any other key. (Analog of OSM from Vial)
It is convenient to use with modifiers, assigning &sk LShift, you do not need to hold down the Shift key to type a capital letter, but simply press &sk LShift once and immediately release it, the next letter will already be capitalized.

Behaviors tab
On the Behaviors tab, you can create your own custom Behaviors and configure standard ones. Let’s start with configuring standard ones.
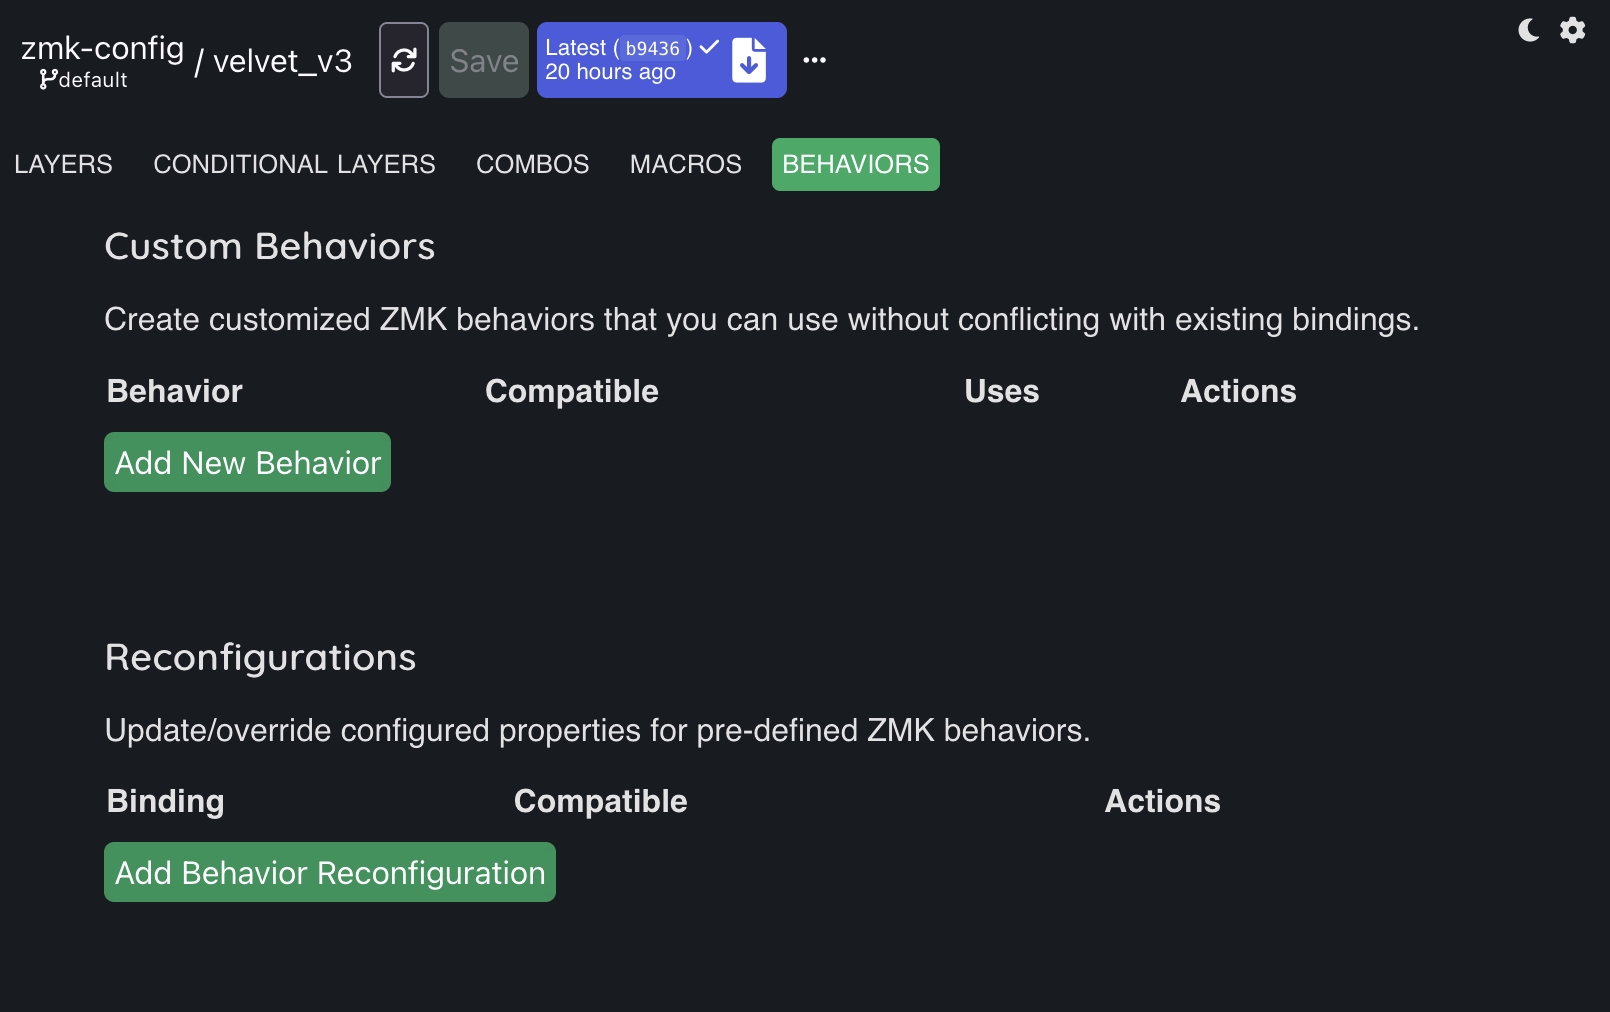
Reconfigurations
Here we can change the properties of standard Behaviors, such as those described in the Layers section.
Click the Add Behavior Reconfiguration button, in the opened menu select, for example, &sl.
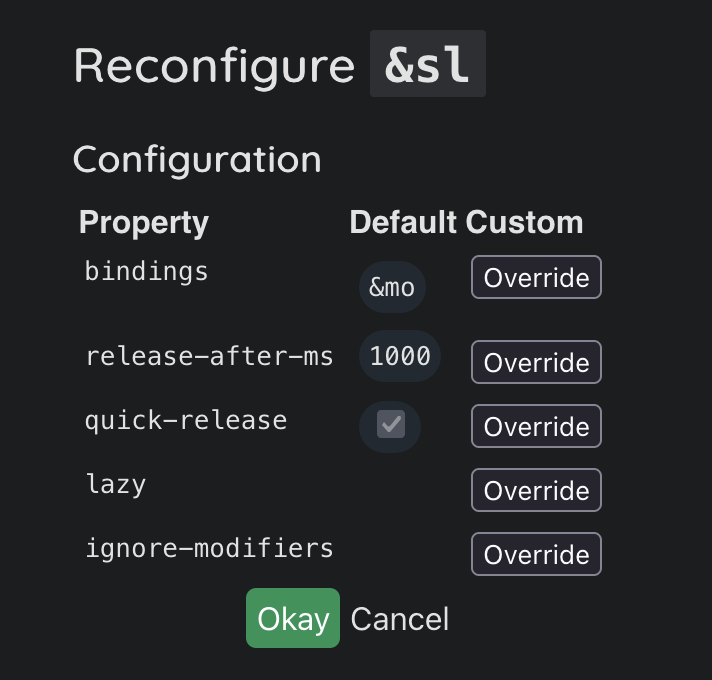
In the opened Reconfigure &sl window, we see standard properties that we can change. Let’s increase the timeout for &sl so that the layer remains active not for 1 second, but for 3. To do this, in the release-after-ms property line, click the Override button and enter 3000 in the appeared field (the units of measurement in the field are milliseconds), and click Okay.
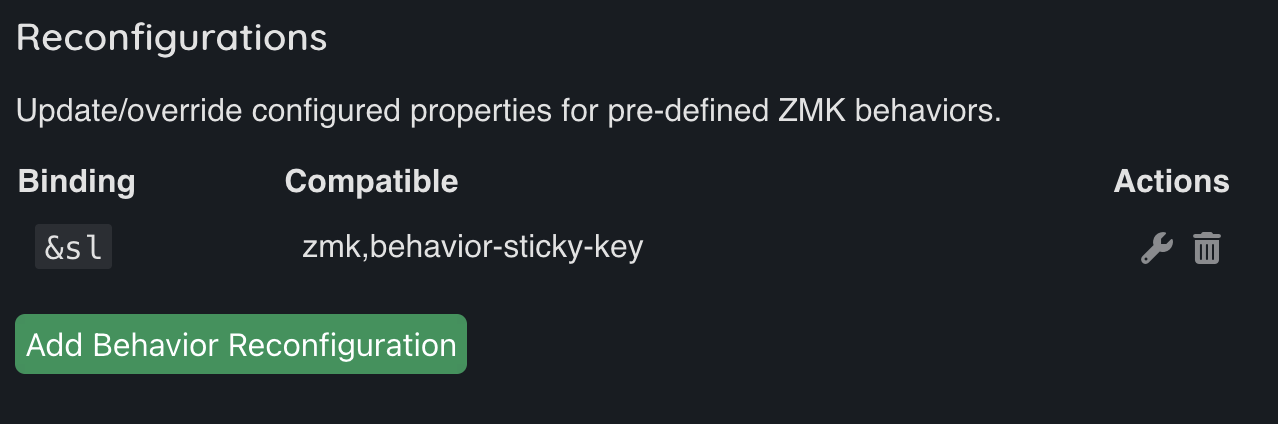
The &sl entry with overridden properties appeared in the Reconfigure section.
To view the properties, click the Edit button. To completely return the properties to their default values, click the Delete button.
Detailed information about all properties of Behaviors in the ZMK documentation.
Custom Behaviors
In this section, we can create our own custom Behavior based on standard ones. Let’s create a Behavior that will be convenient to implement Home Row Mods (hereinafter HRM), a popular approach to layout design, the main idea of which is that the keys of the home row (A, S, D, F and J, K, L, ;), when held down, activate the modifiers Shift, Ctrl, Gui or Alt. Click Add New Behavior, in the opened window select Hold or Tap behavior.
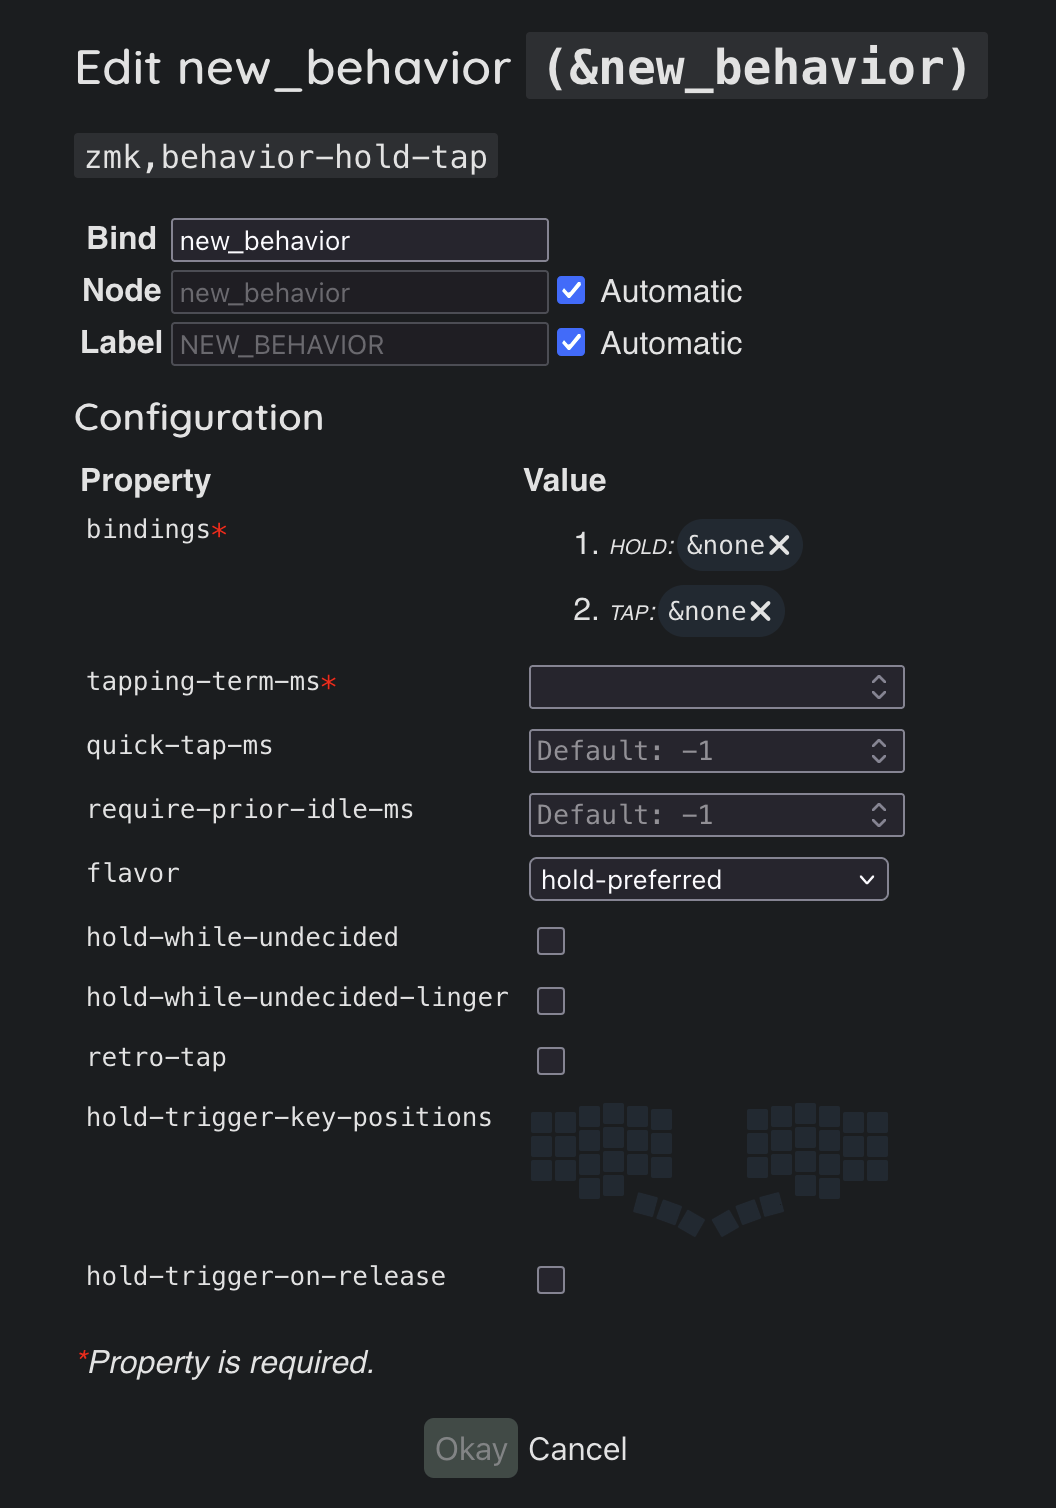
In this window, you need to describe the template of what Behaviors will be performed when tapped and held, as well as several properties. Fill in the properties:
Bind: “hrm”. The name of the behavior, this is what we can use to find the behavior when assigning it to a key;bindings — HOLD:&kp. When holding the key down, the key with the modifier will be pressed, an ordinary&kpis suitable for this;bindings — TAP:&kp. Action for a short press,&kpis also suitable for pressing a key with a letter;tapping-term-ms: 200. If the key is pressed less than 200 milliseconds, then the keyboard will register TAP and the key, for example D, will be pressed. If the key is held down more than 200 milliseconds, then HOLD will be registered and the modifier specified in the parameters, for example Ctrl, will be pressed;flavor: balanced. There are several algorithms that allow you to use HRM without strictly relying on the timing fromtapping-term-ms, balanced is just one of them. It implies that if the HRM key was pressed for less than 200 milliseconds, but during the HRM key press another key was pressed and released, then you need to register the HOLD action.
In the ZMK documentation there is an example of creating an HRM that does not depend on timings at all, without interfering with the typing technique and key rolls. The idea is that the modifiers are strictly pressed on one half, and the key with the letter on the other half. The example describes the properties in the form of code, but in keymap-editor all the properties have the same names and they are easy to adapt.
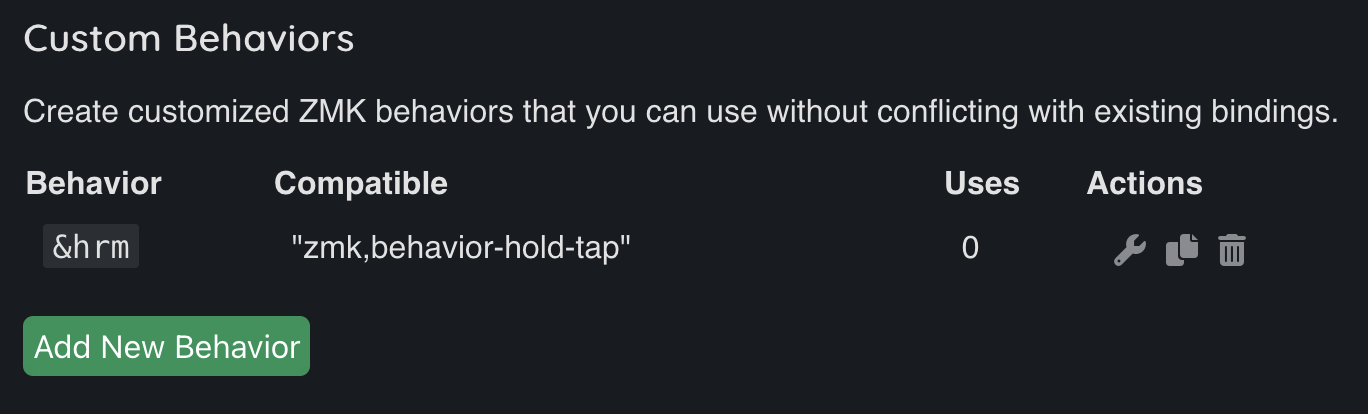
After filling in the properties, click Okay, and we see that our custom Behavior has been successfully created.
Next, go to the Layers tab, and assign the created behavior to the D key. In the Behavior assignment window, we need to find and select the created &hrm.
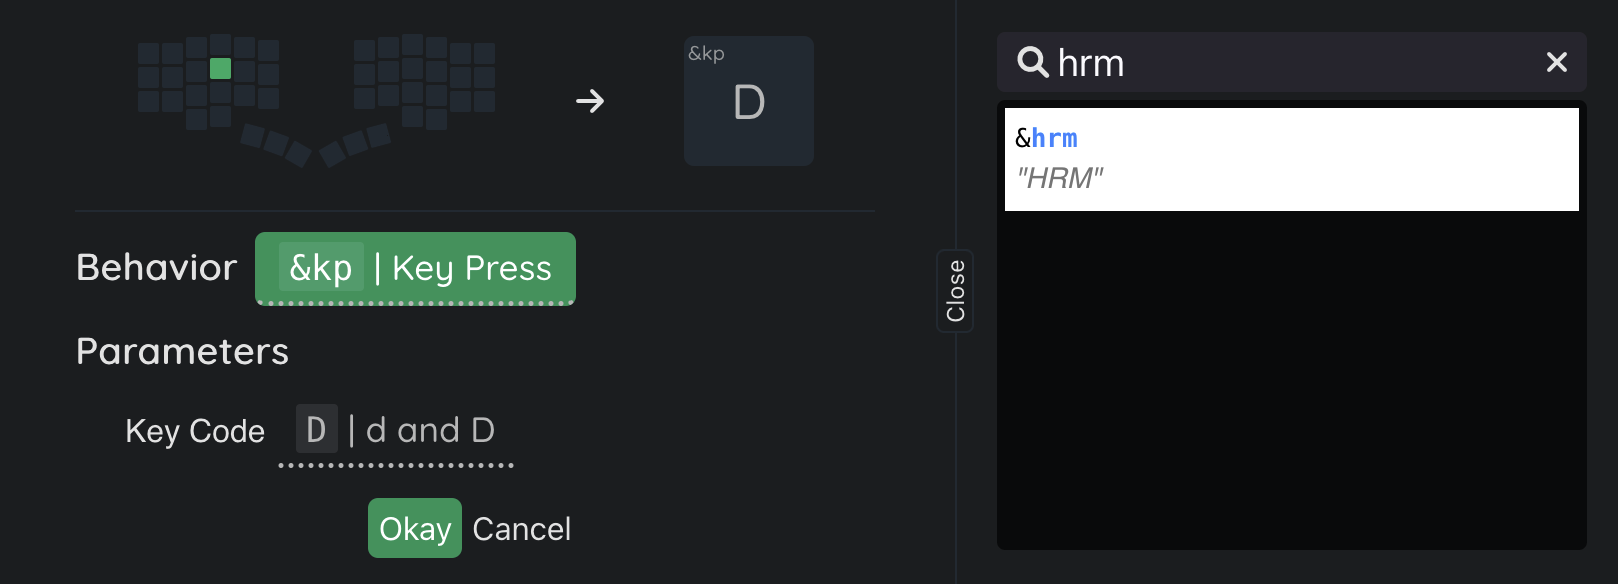
Fill in the parameters:
- In Parameters — HOLD you need to specify the key code of the desired modifier, specify Ctrl.
- In Parameters — TAP you need to specify the key code of the key sent by tap, select D.
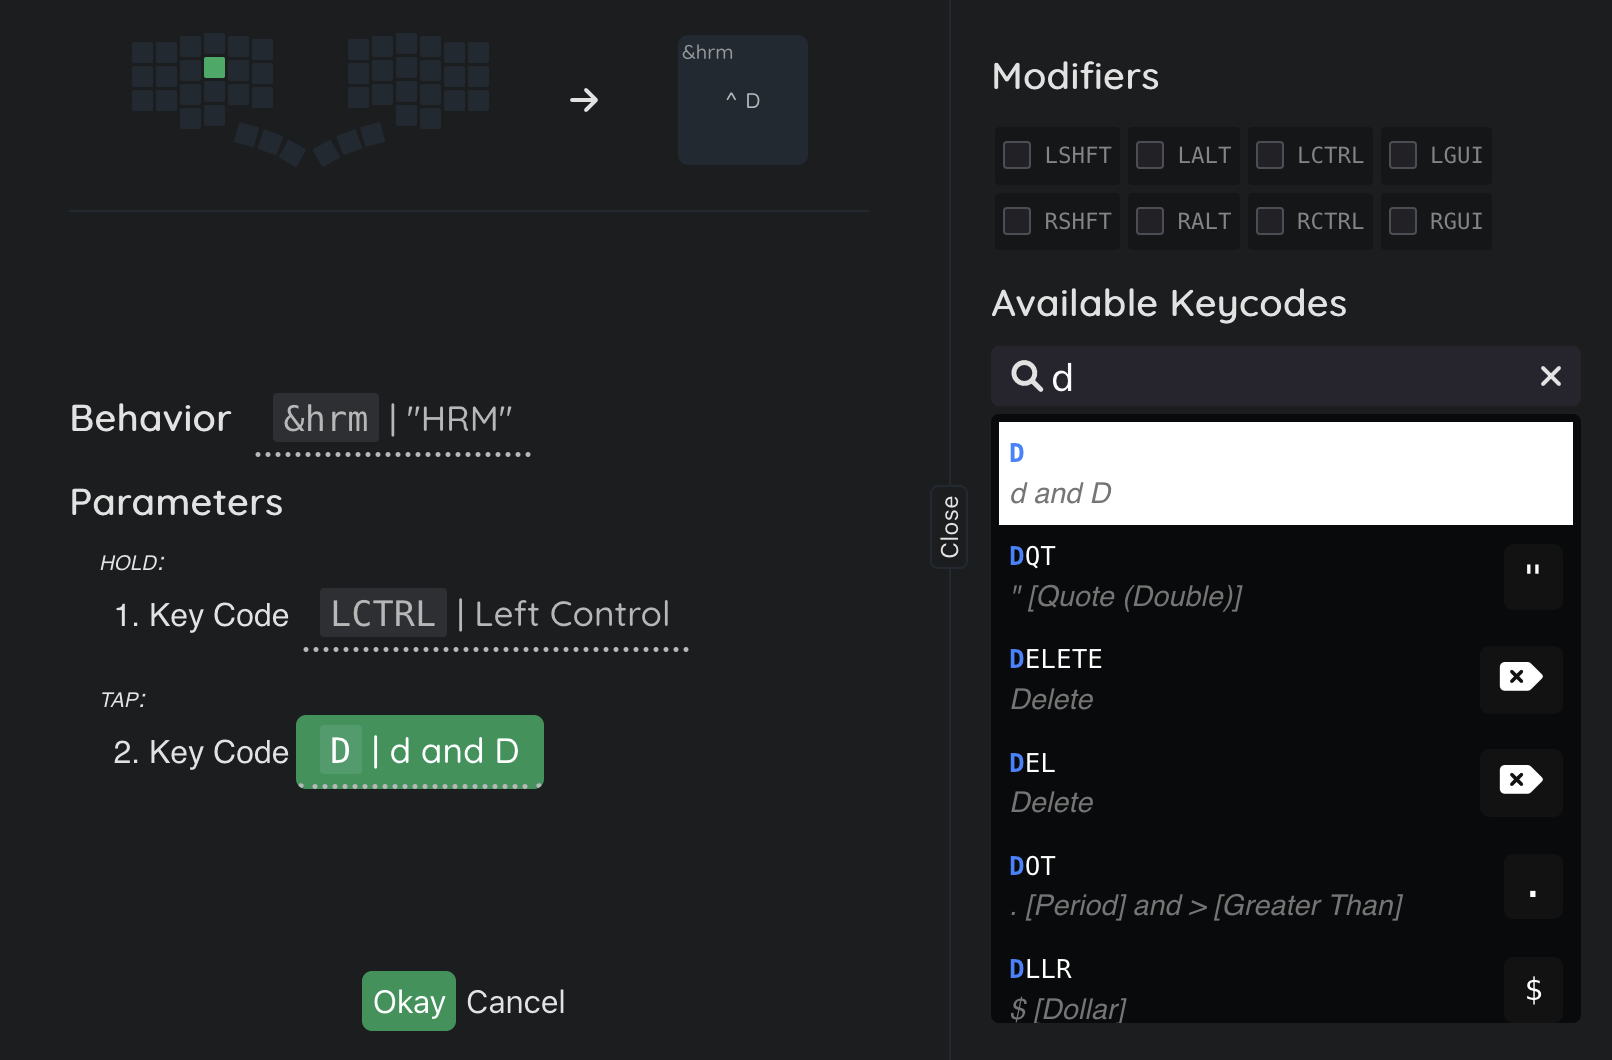
An interesting idea might be to assign the HRM modifier Ctrl to the S key, because then pressing the very frequently used combinations Ctrl + C and Ctrl + V is very convenient with one hand, try it!
After filling in the parameters, click Okay and our first Home Row Mod is assigned! Similarly, we assign HRM modifiers to all other keys, and all modifiers are already under the fingertips, you no longer have to move your hand to get them.
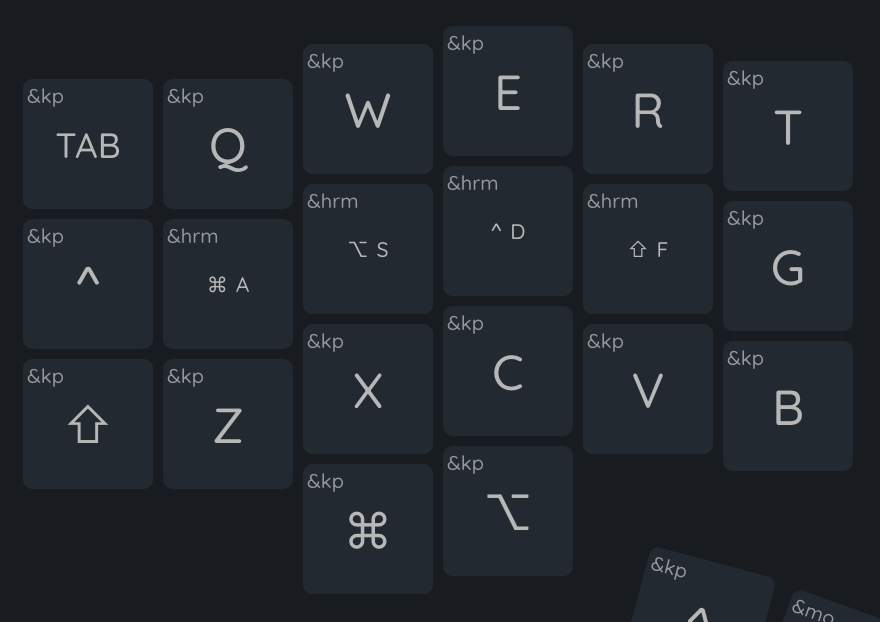
Tip: you can create several Behaviors with different Tapping Term for different fingers. For example, for the little finger (which is weaker than the index finger) it is worth setting a larger Tapping Term value so that accidental presses are not registered as HOLD.
Useful custom behaviors
To create keys with the Behaviors listed below, you need to create a new custom Behavior with the appropriate type.
&td
Tap Dance assigns different Behaviors depending on how many times in a row the key has been tapped.
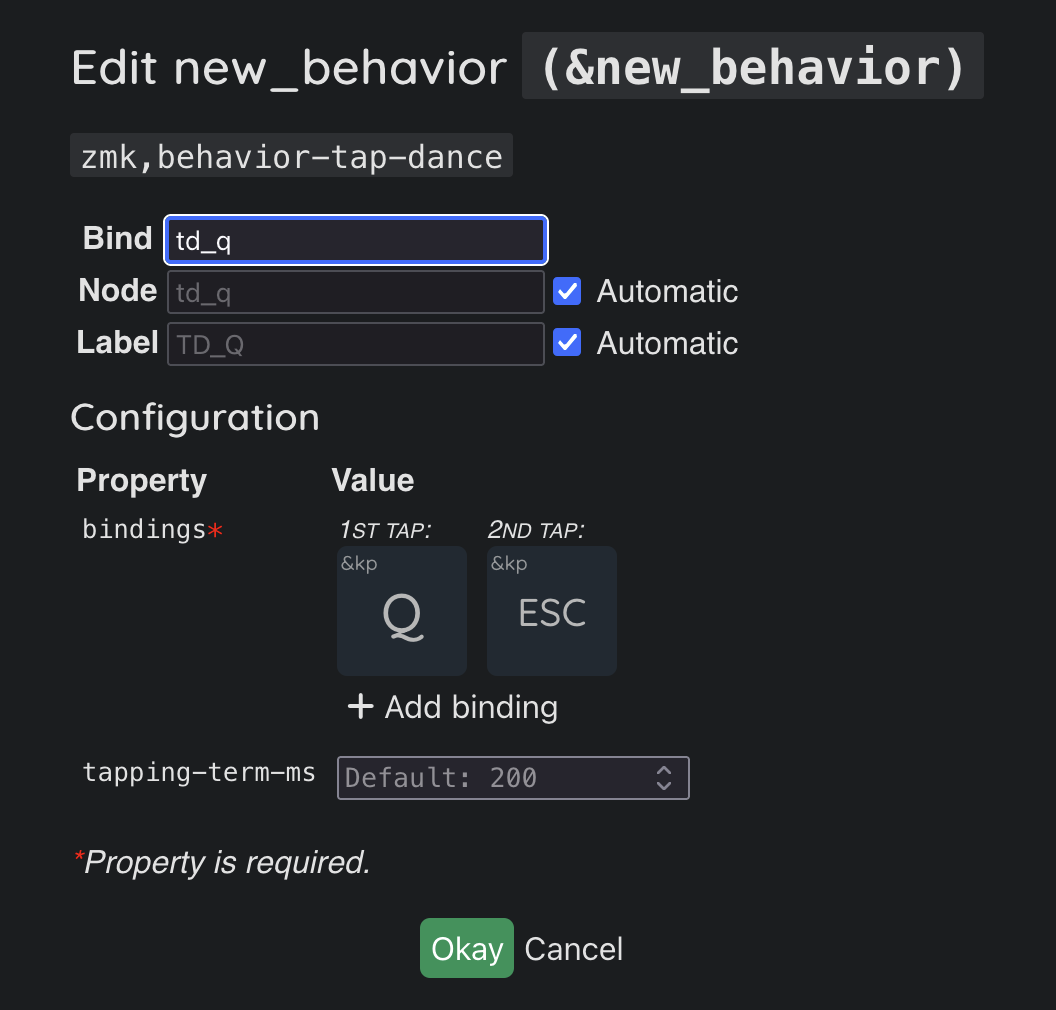
If you assign the Tap Dance from the screenshot to a key, then pressing the key once will type the letter Q, and pressing it twice will press Esc.
Using a combination of this behavior and &mt it is possible to make a key similar to Tap Dance from Vial.
&mod-morph
Mod Morph allows you to add your own custom key press processing if it is pressed with active modifiers Shift, Ctrl, Alt or Gui.
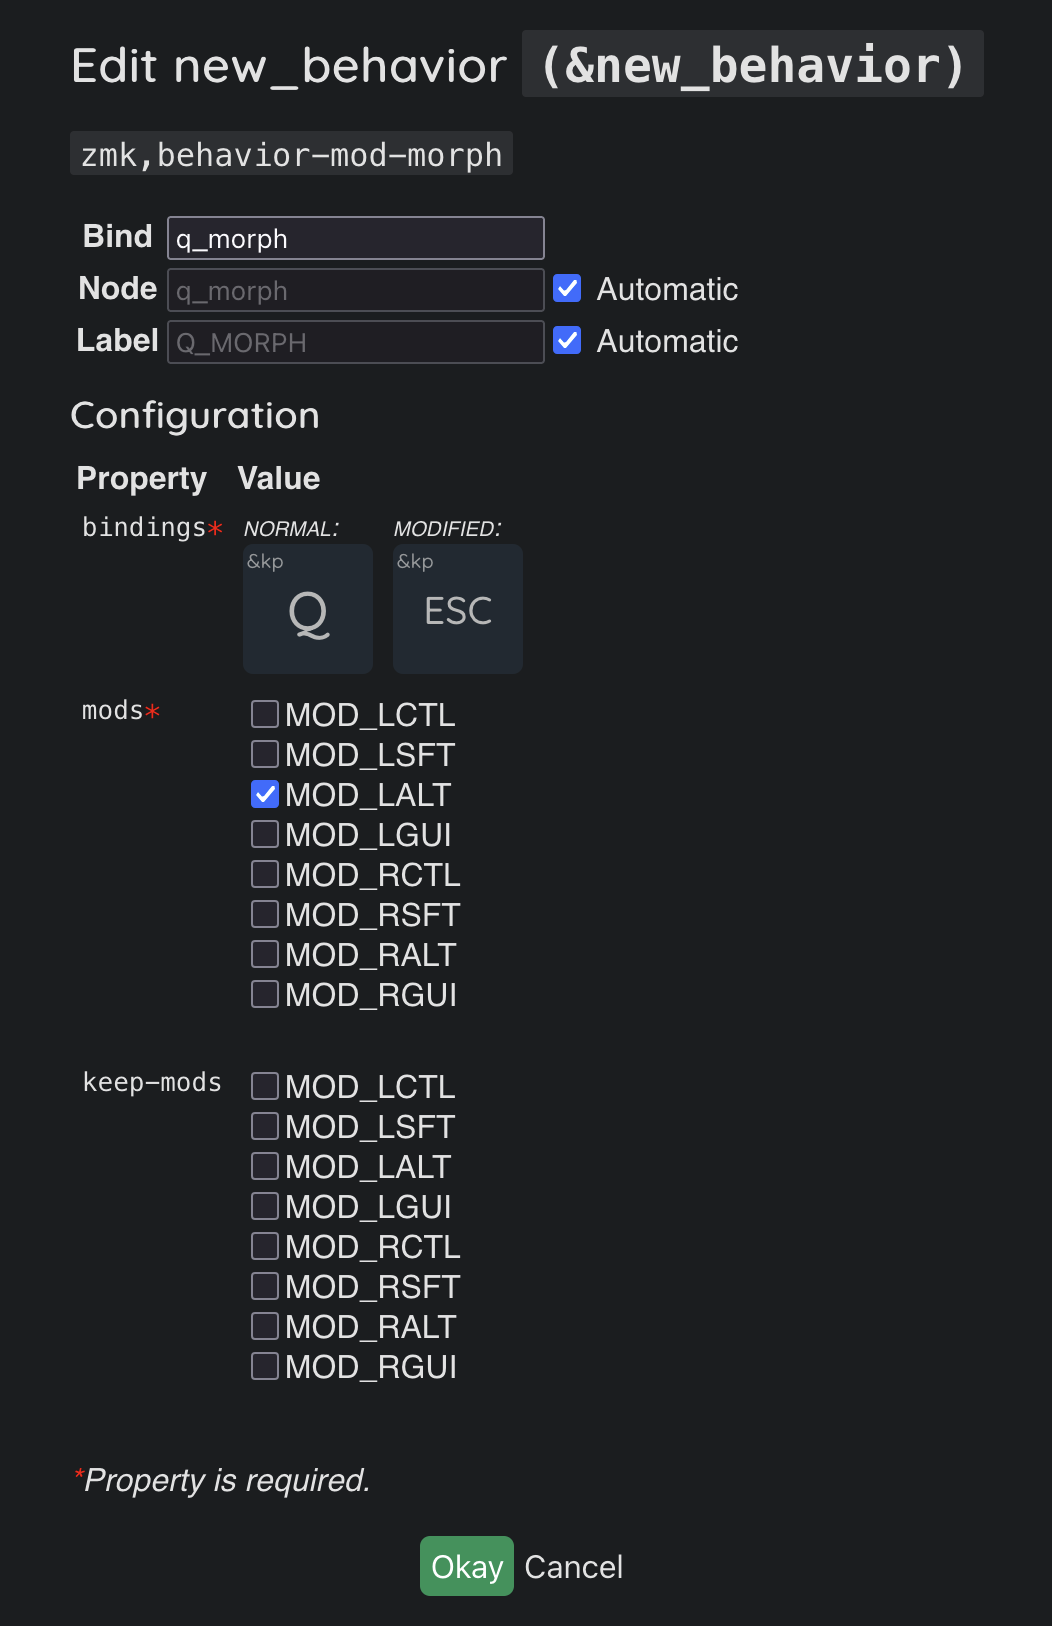
If you assign the Mod Morph from the screenshot to a key, then when you press without modifiers, Q will be typed, and when you hold down the Alt modifier, Esc will be typed. Instead of Esc there can be any Behavior, for example changing the layer, or a macro! This behavior is a more flexible analogue of Key Overrides from Vial.
Combo
Combo allows you to assign a Behavior to the simultaneous pressing of several keys. For example, you can assign the simultaneous pressing of the C and V keys to switch the keyboard layout, or some macro, often this is more convenient than assigning a key in a layer.
To create a Combo, go to the Combos tab and click Add New Combo.
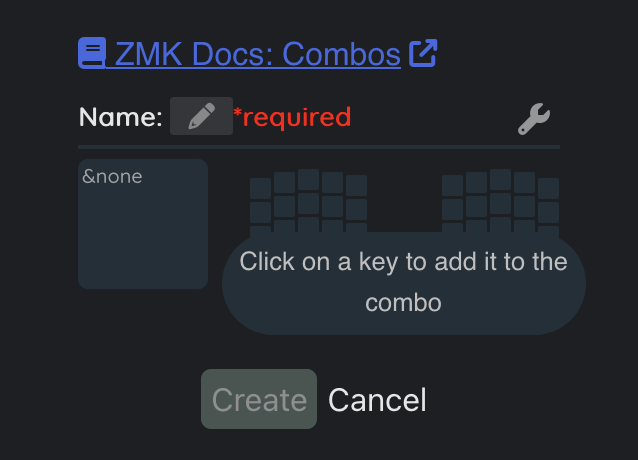
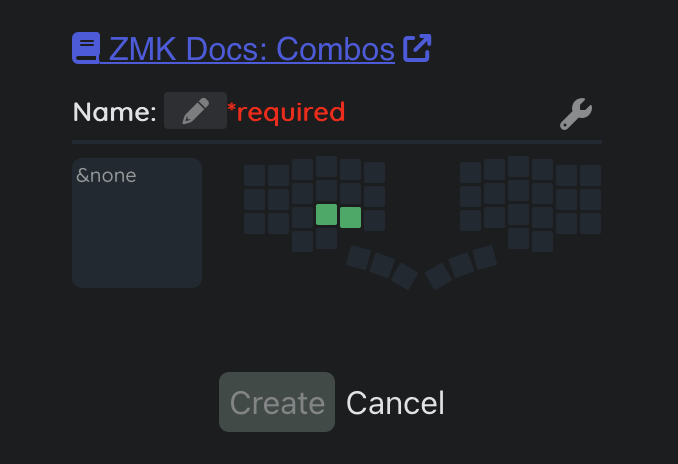
Let’s consider an example with a Combo of the C and V keys to change the layout language. In the opened window, we need to select the positions of the keys, pressing which will lead to the activation of the combo. To do this, simply click on the positions where the C and V keys are located.
Fill in the name of the combo (in the screenshot “lang”), and select the Behavior when the combo is activated. &kp pressing Space with the GUI modifier held down is suitable for changing the layout language.
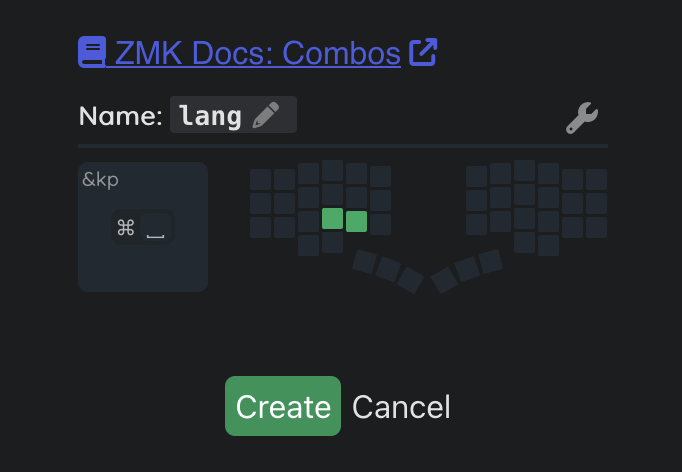
Click on the Create button and the combo is ready to use!
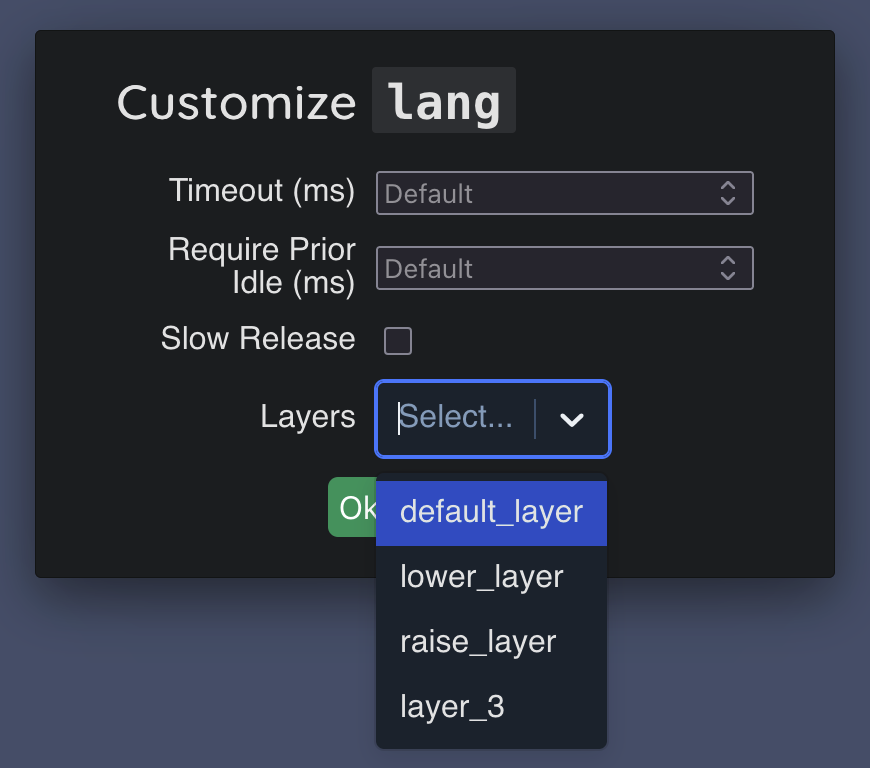
By clicking on the button with the wrench, we can make additional settings for the Combo, for example, change the trigger timeout, or specify on which specific layers the Combo will work (by default, combos work on all layers). You can read more about these settings in the ZMK documentation.
Macros
With the help of Macros you can save some frequently used sequence of key combinations and call this sequence by pressing just one key, for example, make a Macro that types various templates, like this:
```
```
at the end, the macro can also move the cursor to the middle of this template, saving a lot of presses!
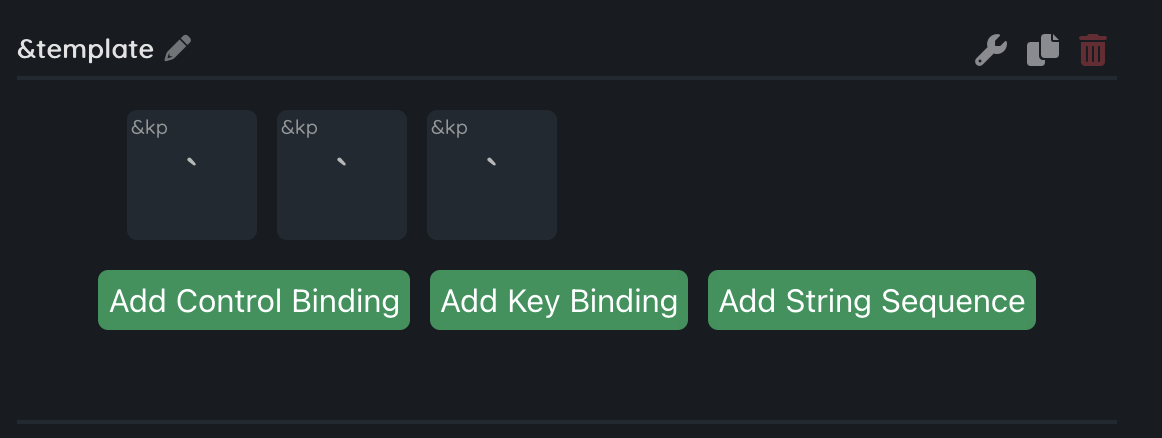
Let’s analyze the creation of such a Macro as an example. Go to the Macros tab, and click Add New Macro. In the opened window, enter the name of the Macro, for example, enter “template” and click Create.

Next, we need to compose the actions that the Macro will perform. To make the macro type the symbol ` three times, we use the &kp Behavior three times. When creating a macro, a cell for one Behavior is immediately added, let’s add 2 more by pressing the Add Key Binding button twice, and assign &kp ` in all three cells.
Next, we need to make a line break twice, again write the symbol ` three times and as the last step press the ↑ key to move the cursor to the center of the template.
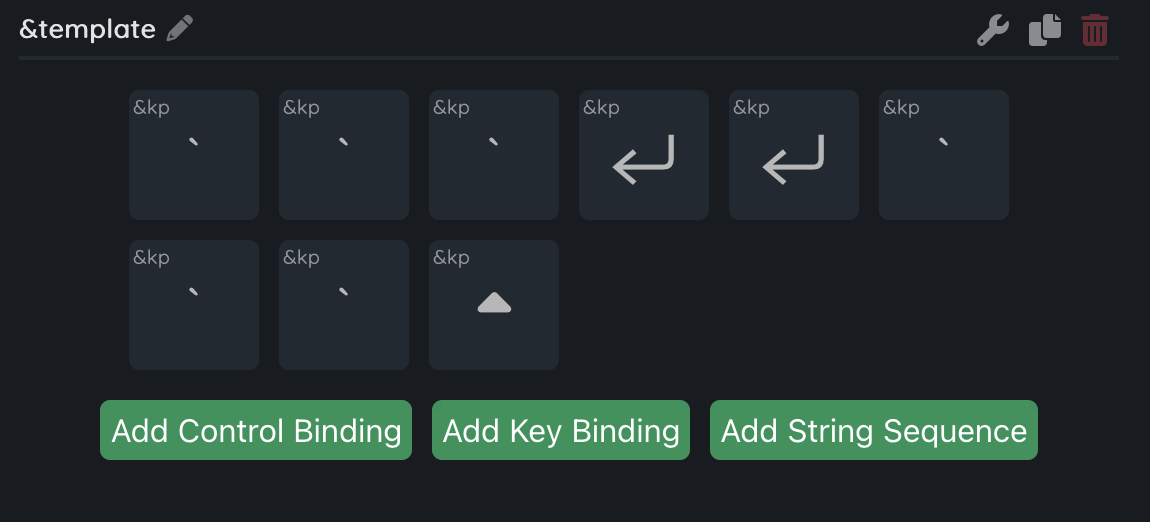
In total, it turns out 9 presses, as many as 9 presses are reduced to just 1!
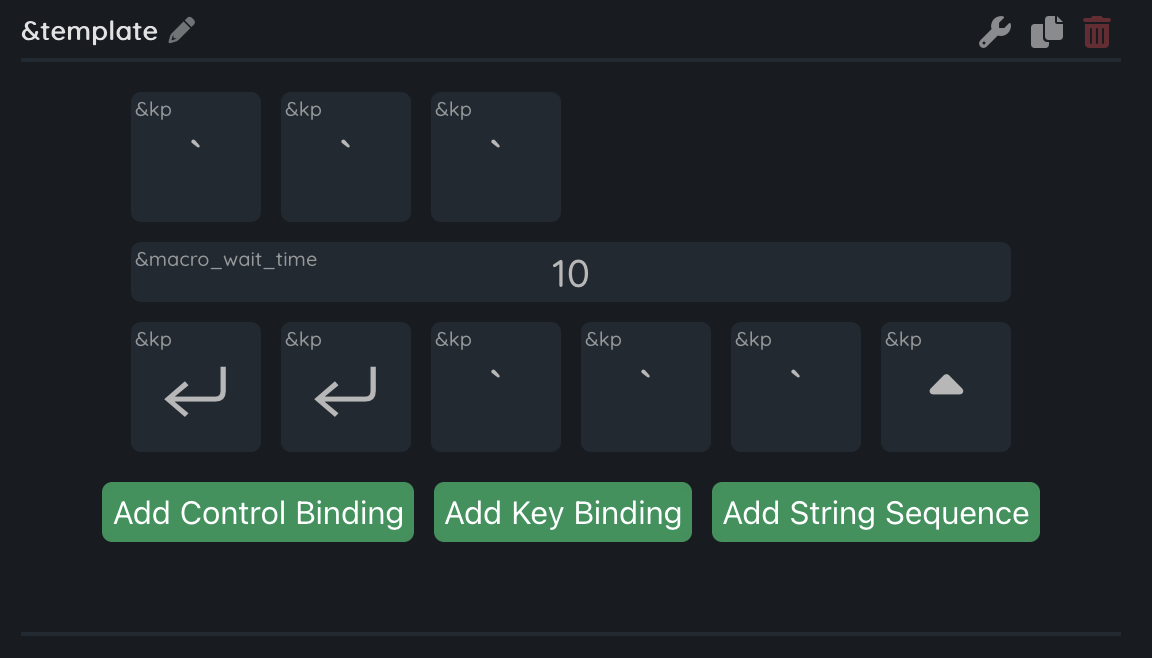
By default, ZMK will press each key for 30 ms, and there will be a pause of 15 ms between each press so that the OS has time to process each press. To make the actions work for sure (in all sorts of slow corporate messengers, remote desktops and jiras), and also to make the actions performed by the Macro a little more readable, we divide them into groups by adding an additional pause of 10 ms. To do this, click Add Control Binding and move the appeared ¯o_press after the first three presses of `. Now we must not forget to change ¯o_press to ¯o_wait_time. To do this, click on it and select ¯o_wait_time, in the Raw Value parameter specify 10, this is the number of milliseconds that the macro will wait.
Such a delay may not be enough when working on remote desktops, and if this happens, you can increase the time of each press and the delay in the macro parameters, they are opened by clicking on the button with the wrench icon.
It already looks more readable, let’s add the same ¯o_wait_time after two presses of Enter and after the second group of presses of `.
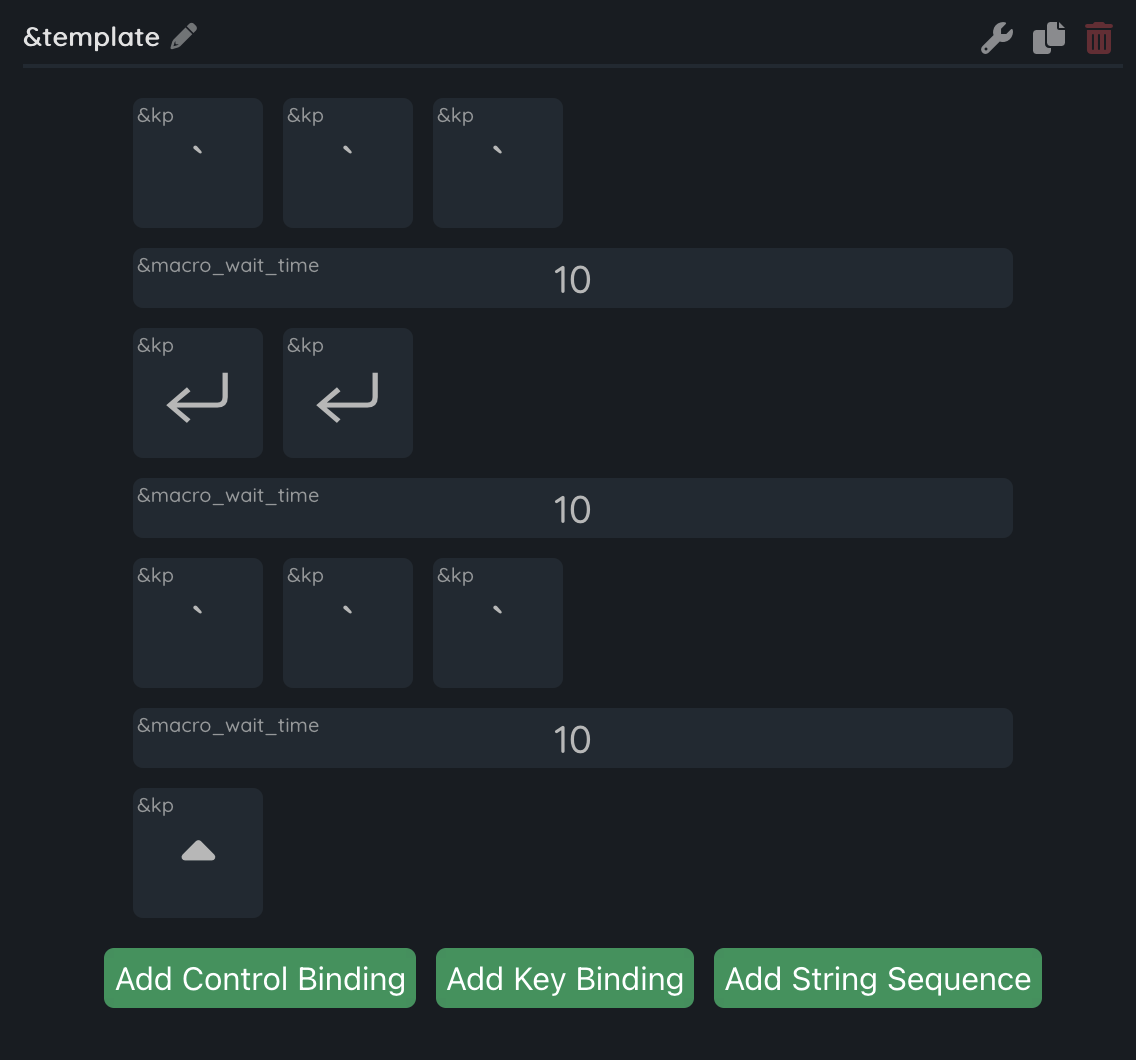
Beauty, now it is visually clear what the Macro does. We only have to assign the Macro to a key or Combo, and you can use it!
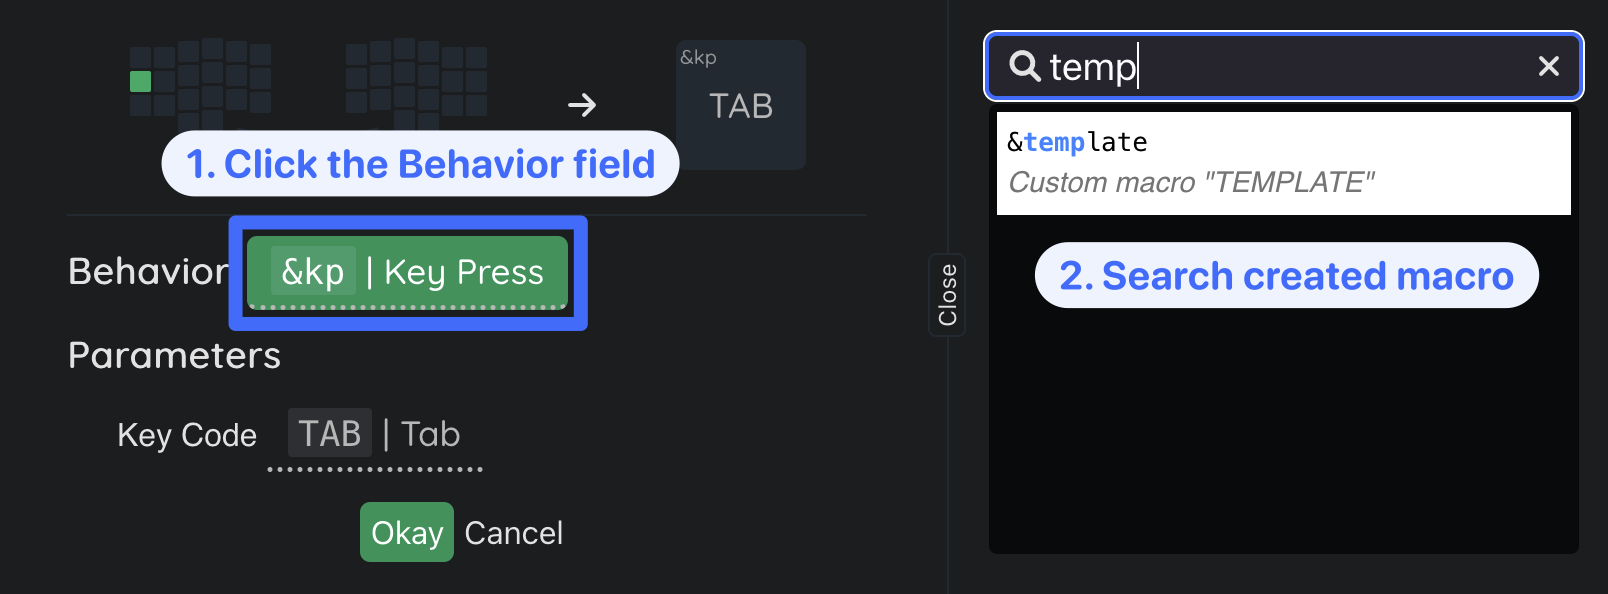
Macro is a Behavior, and you need to select it in the Behavior field.
Macro execution cycle
Macros in ZMK are executed in 2 steps:
- Actions when the macro is pressed,
- Actions when the macro is released.
Initially, this is not noticeable, because without a specific Control Binding, all actions are performed immediately when pressed. To learn how to distinguish between these 2 steps, we will need the following Control Bindings:
¯o_press- for subsequent presses sets the mode in which the specified key will be pressed, but will not be released;¯o_release- for subsequent presses sets the mode in which the specified key will be released;¯o_tap- for subsequent presses sets the mode in which the specified key will be pressed, and after the time specified in tap_time, will be released (default mode);¯o_tap_time- sets the time between pressing and releasing each key in the macro (30 ms by default);¯o_pause_for_release- at this point, the Macro will stop its execution until the Macro key is released.
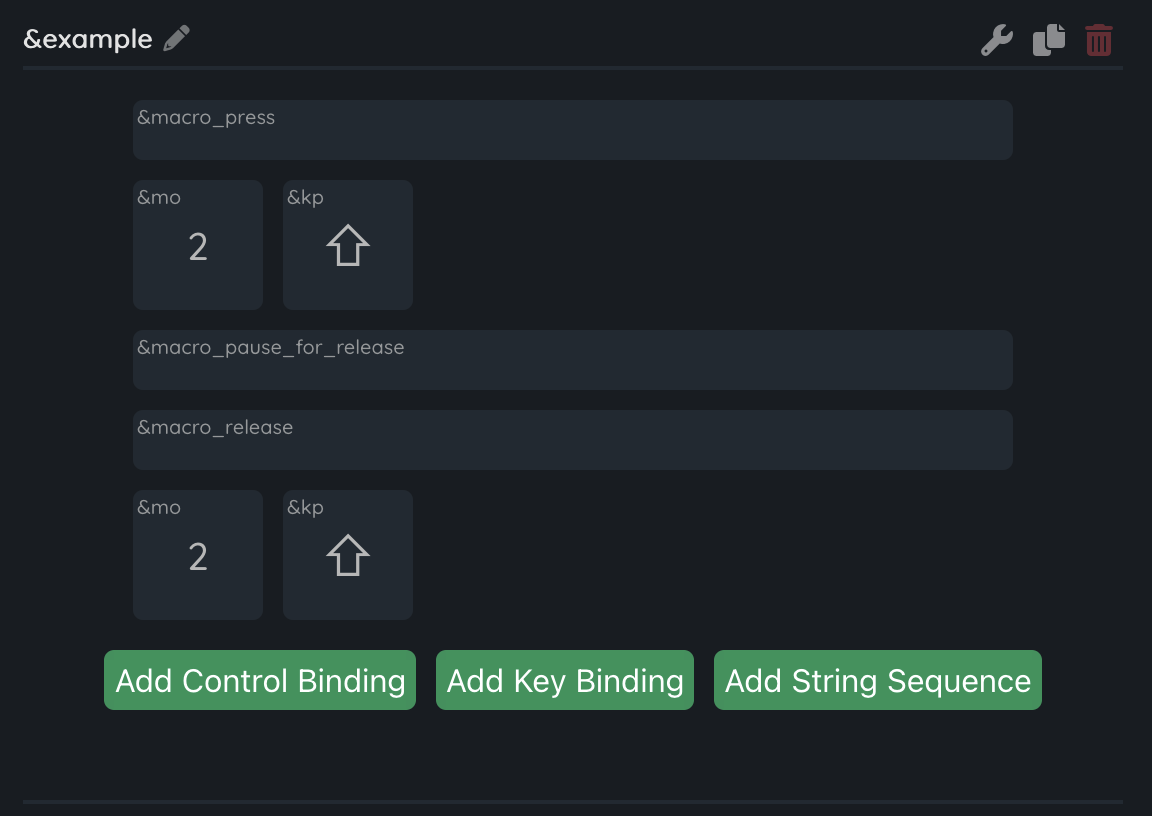
By applying the listed Control Bindings, you can create a macro that, when pressed, switches the layer, presses a certain modifier, then waits for the macro to be released, and after that returns the layer back and releases the modifier. It turns out a key that combines &mo and &kp, two in one!
Parameterized macros
Macros in ZMK have an interesting feature, they can be parameterized. To use parameters, you need to apply one or more of the listed Control Bindings:
¯o_param_1to1- to the next Behavior in the macro, the value from parameter 1 of the Macro will be passed as parameter 1;¯o_param_1to2- to the next Behavior in the macro, the value from parameter 1 of the Macro will be passed as parameter 2;¯o_param_2to1- to the next Behavior in the macro, the value from parameter 2 of the Macro will be passed as parameter 1;¯o_param_2to2- to the next Behavior in the macro, the value from parameter 2 of the Macro will be passed as parameter 2.
Let’s consider an example, implementing a Macro that, when pressed, activates the layer passed in the parameter, presses the modifier passed in the parameter, waits for the key to be released, and then turns off the passed layer and releases the modifier passed in the parameter.
Let’s call the Macro &ml (mod-layer), it will look like this:
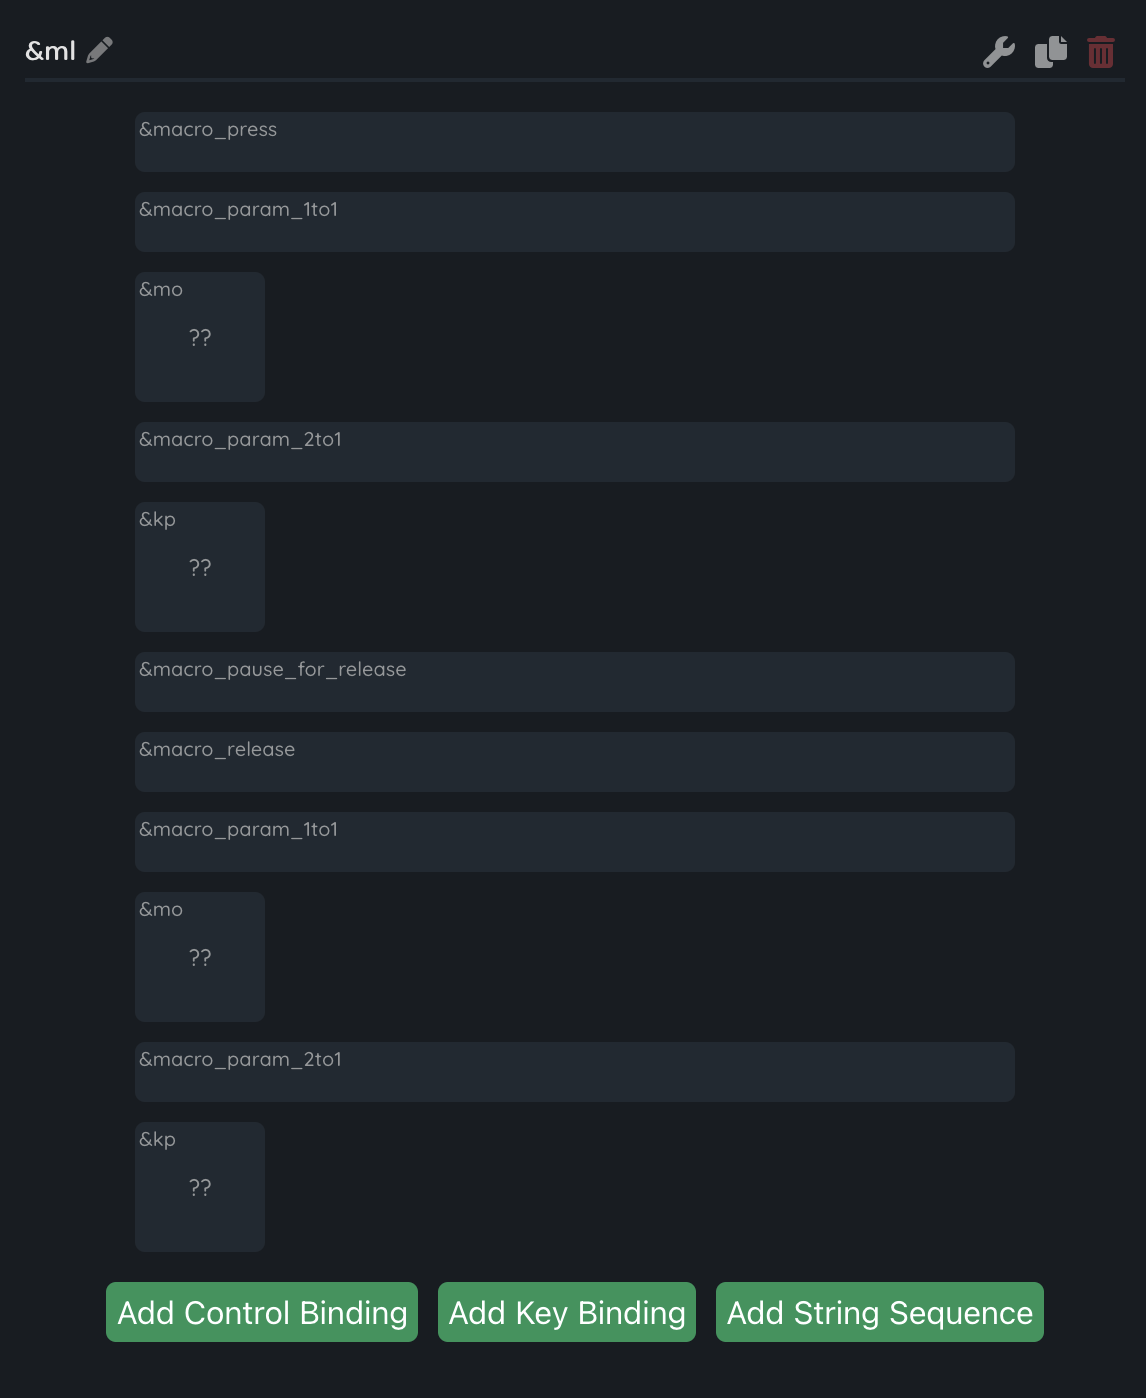
¯o_param_1to1 and ¯o_param_2to1 are selected because the used Behaviors &mo and &kp have one input parameter each.
It is worth paying attention to how the Macro is assigned in the layout. In the Behavior list, find the created Macro &ml, after selecting it, we need to fill in the parameters:
- Layer - this is the layer that will be passed as a parameter for
&mo, select 2; - Key Code - this is the key passed to
&kp, it will be pressed simultaneously with&mo, we planned to use a modifier, so select LShift.
That’s it, the macro is ready to use! The beauty of such a macro is that it can be used in several places in the layout, specifying any layer to switch to, and any modifier.
When creating a custom Hold or Tap behavior, in
bindings — HOLDandTAPyou can specify any Behaviors, even parameterized macros - this is very flexible, because when you hold the key, any actions will be performed, whatever comes to mind. For example, in the ZMK documentation there is such an idea: a parameterized macro in which, when the layer is activated, the color of the RGB backlight also changes to the one specified in the parameter, that is, probably, after K:03 and Imperial move to the ZMK rails, it will be possible to select the LED color for different layers! And you can combine this not only with layers, but with anything, even with modifiers!